![]()
![]()

![]()
How to efficiently install, host, and maintain lightning fast Wordpress websites inside Docker Desktop on Windows 11
Navigation
- Prerequisite
- Creating a Custom Network
- Folder Organization
- Configuring .env file
- Configuring docker-compose.yml file
- Execute and Test
- Reverse Proxy Steps
- Redis Plugin
- Final Test
Prerequisite
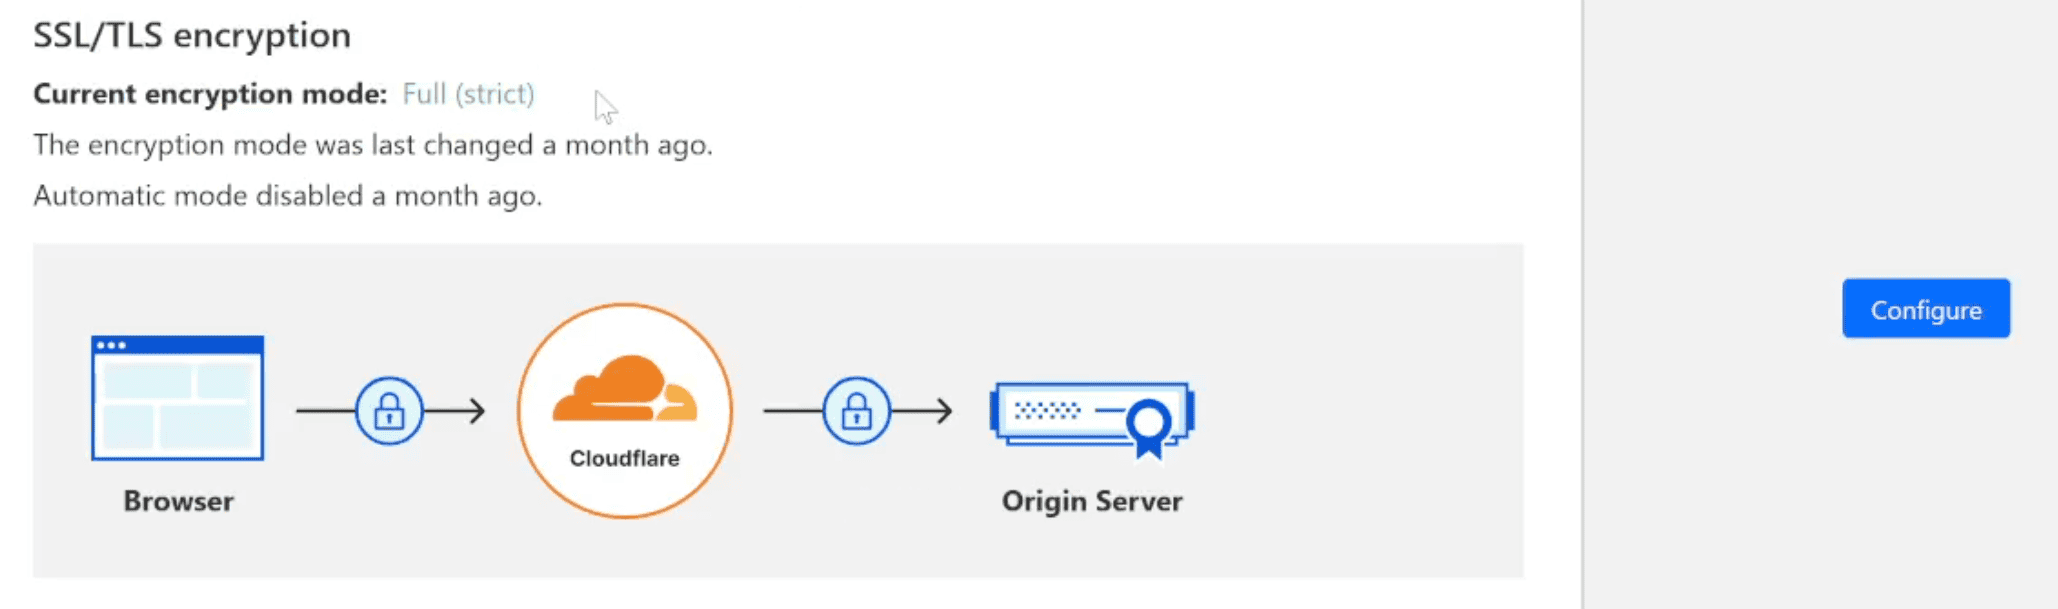
- If you are using Cloudflare to host your domain, you NEED to make sure that it's SSL/TLS encryption mode is set to 'Full (strict)'. By default, domains are set to 'Flexible' and you'll get thrown in an infinite loop when you try and go to your website while using a reverse proxy
-
For these instructions we'll be using the example domain called 'website.com' and will be changing names and code to match it accordingly, like this 'wp-website-com'
-
For very nice organization, I recommend keeping the ' wp- ' part at the beginning of the naming scheme so you can easily filter out containers and find what you're looking for very quickly and neatly
-
The password to extract all of the tutorial files from the zip file is: JHammaH
-
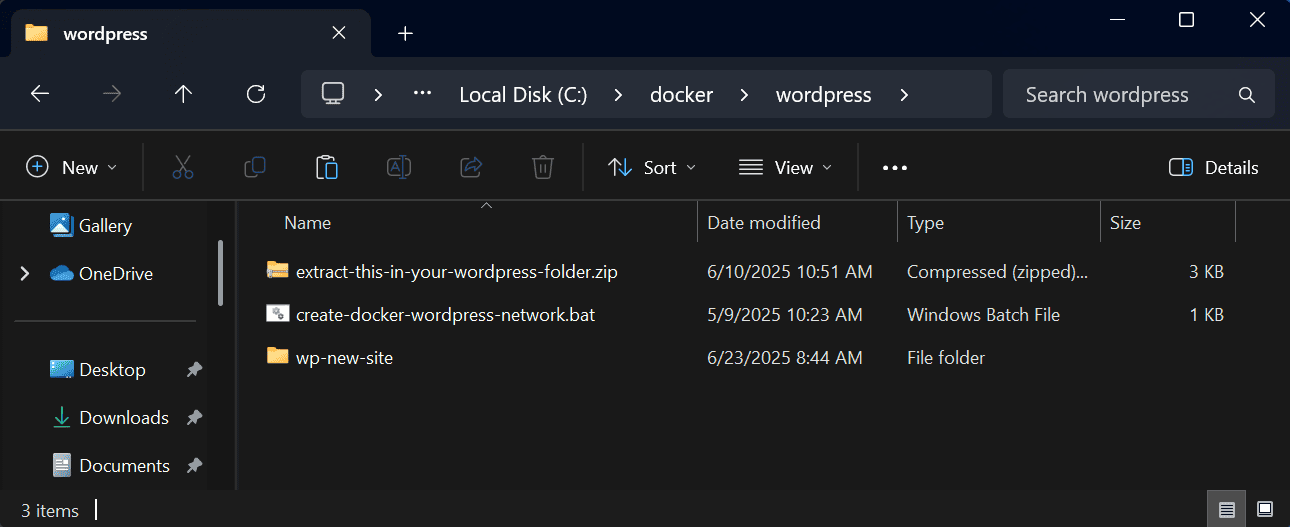
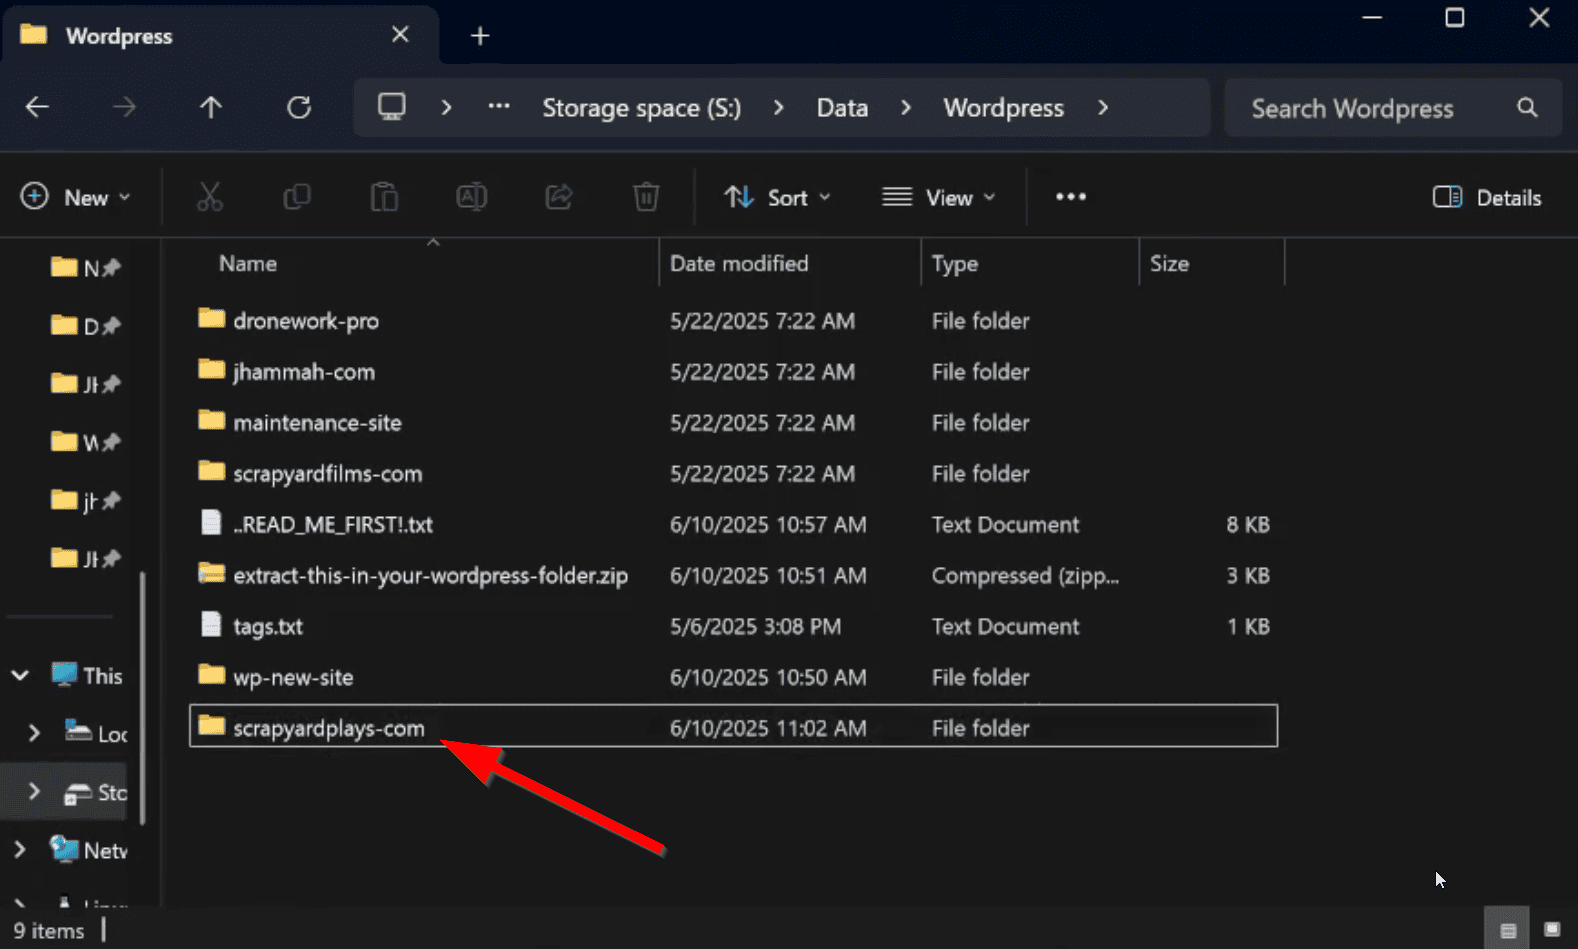
Create a folder called ' wordpress ' in an easy to find directory like: ' c:/docker/wordpress '
-
Extract the zip file called ' extract-this-in-your-wordpress-folder.zip ' to inside the new ' wordpress ' folder. You will see a .bat file and a folder called ' wp-new-site '
-
Inside the ' nwp-new-site ' folder, there will be three files. A Dockerfile, .env file, and a .yml file
Creating a Custom Network
-
Before you do anything else, you'll need to create a custom network specifically for your Wordpress sites so you don't run out of IP's which can confuse docker and cause issues with reverse proxies
-
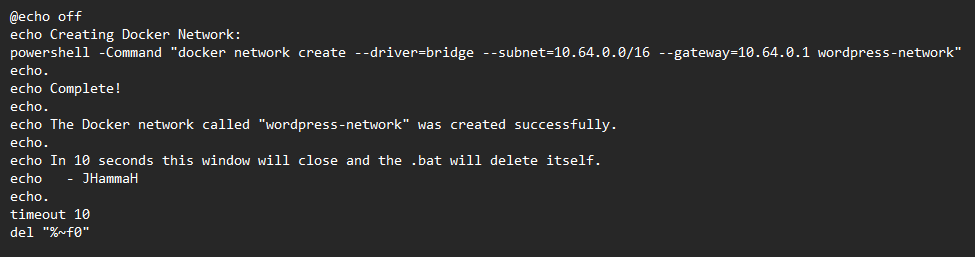
Conveniently I made a simple batch file called 'create-docker-wordpress-network.bat' that all you need to do is double-click
-
It will create the network range 10.64.0.0 within Docker and then delete itself since you only need to run it once

- If you want to use a different network range instead of 10.64.0.0, you can right click on the batch file and change the range to whatever you want. Then save the bat file and run it
Folder Organization
-
Now you'll need to organize the folder names, which is very important
-
Copy the ' wp-new-site ' folder and paste it in the same directory and it should create a new folder called ' wp-new-site - Copy '. This will leave the ' wp-new-site ' folder untouched so it can remain a template that you can copy/paste as many times as you want for any new site you want to launch
-
Rename the new folder you just created, ' wp-new-site - Copy ', to match your specific domain. Ex. ' wp-website-com '. You're keeping the 'wp-' part for easy filtering. You're changing the word 'new' to whatever your domain is. Then you're changing the word 'site' to whatever your domain extention is
-
So here are a couple of examples:
- For 'jhammah.com', you would change 'wp-new-site' to 'wp-jhammah-com'
- For 'takedownthe.gov', you would change 'wp-new-site' to 'wp-takedownthe-gov'
- For 'dronework.pro', you would change 'wp-new-site' to 'wp-dronework-pro'
-
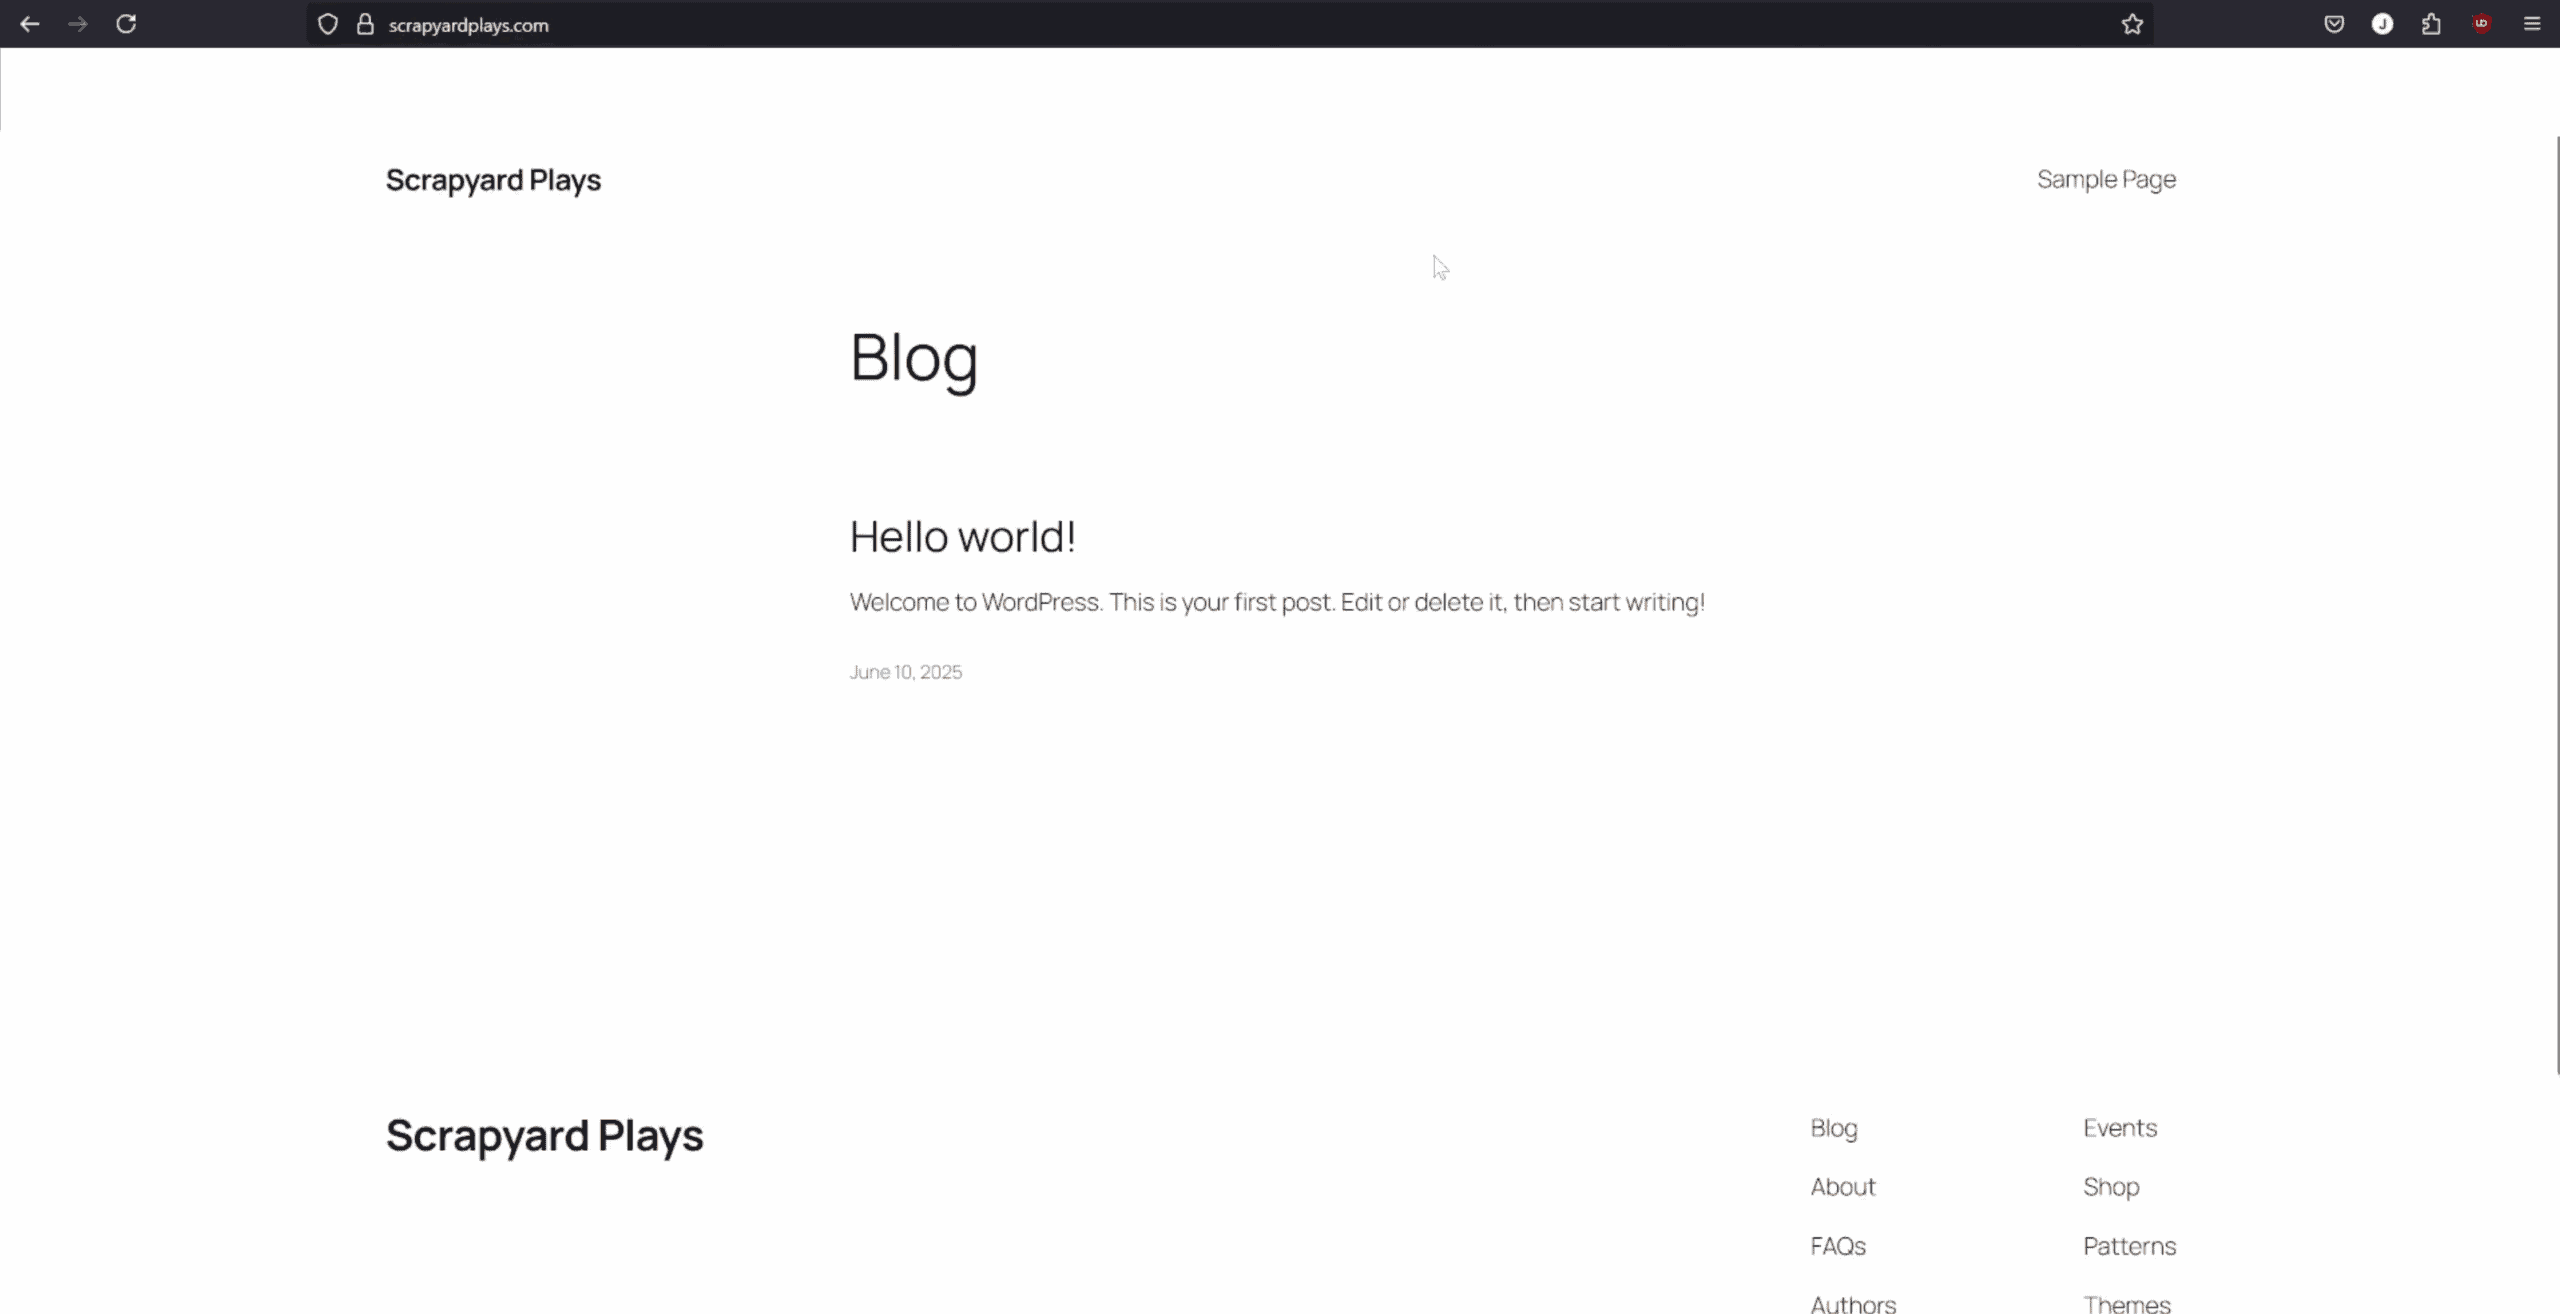
For this tutorial, I'll be creating a site for the domain I own, scrapyardplays.com, which means I'll change 'wp-new-site' to 'wp-scrapyardplays-com'
Configuring .env file
-
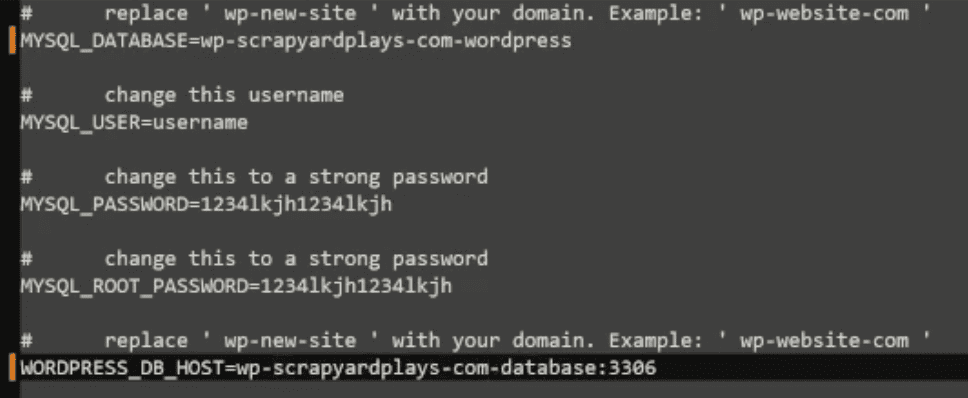
This is the .env file. Here you will want to change the default names of things to match your new site and folder naming structure
-
Rename the MYSQL Database
-
Rename the MYSQL User
-
Enter a strong MYSQL password
-
Enter a stronger MYSQL Root password
-
Rename the MYSQL Database Host
Configuring docker-compose.yml file
-
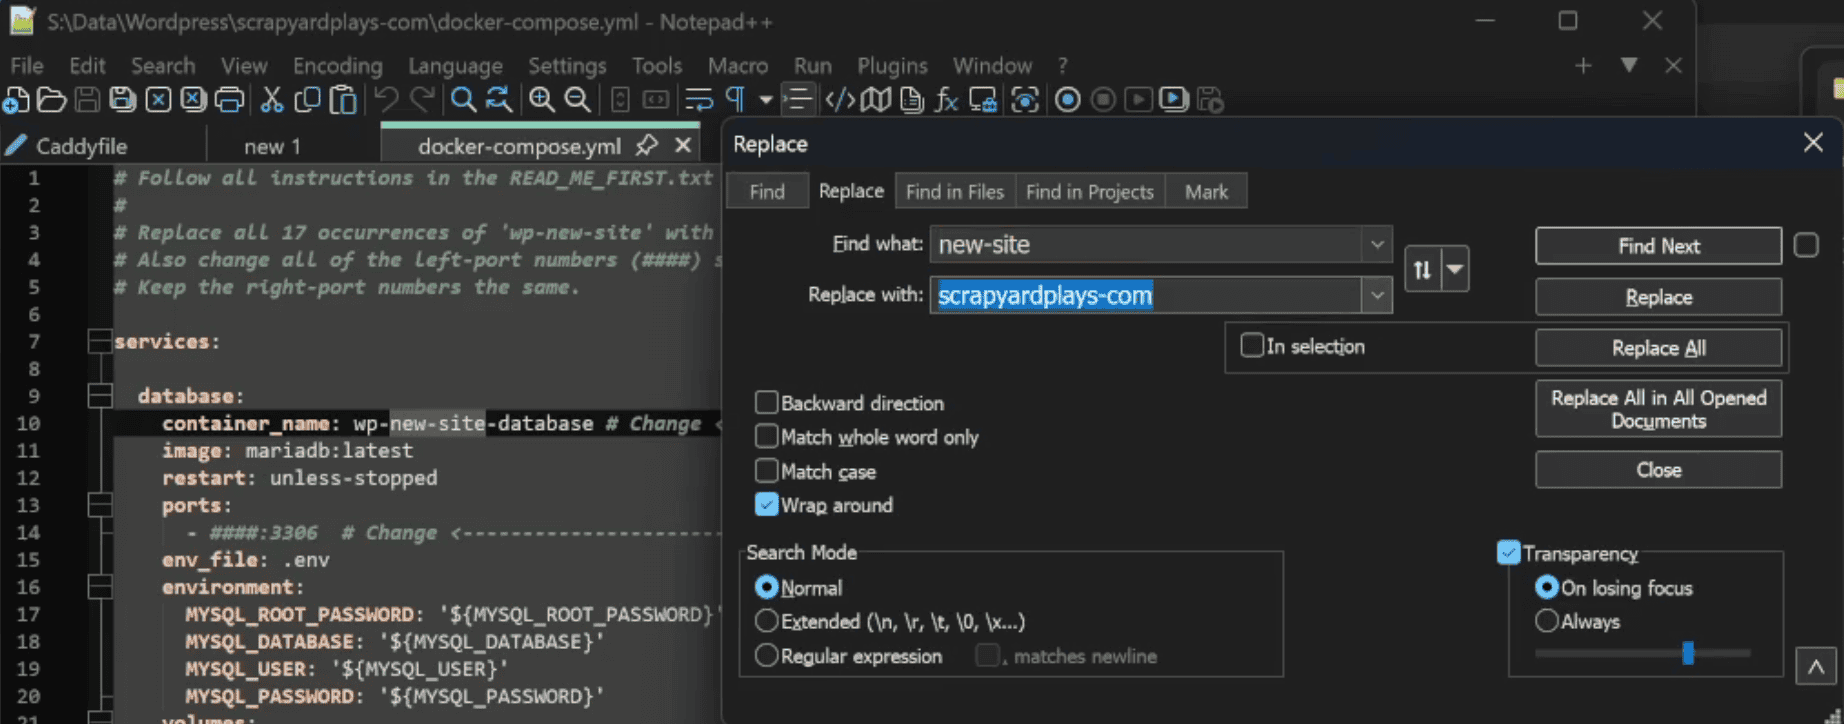
Here is the docker-compose.yml file which contains all of the infor to create containers for your site
-
Open the ' docker-compose.yml ' file and you'll neet to make some mass changes which is really easy with just about any text editor
-
You will replace all 17 occurrences of ' wp-new-site ' with your ' wp-website-com '. Most Text editors should be able to replace words in bulk. So for this tutorial, I'm replacing all 17 occurrences of ' wp-new-site ' with ' wp-scrapyardplays-com '
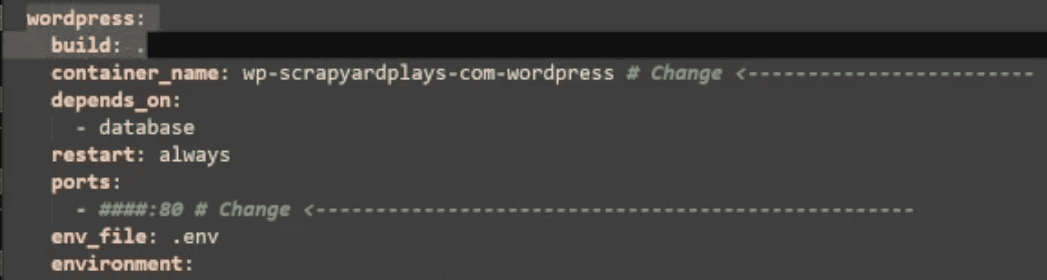
- Note that in the 'wordpress' container, we're not pulling an image. Instead we're referencing the 'Dockerfile' by adding the function 'build' and telling it that the Dockerfile should be in the same location as the .yml file by adding a period
-
If you open the Dockerfile, you'll see that it's first line is to pull the latest wordpress image. But then you'll notice the second line which are basic Linux update commands.
-
These lines are very important as they immediately update the core of the wordpress container's Linux environment upon container stopping and startings.
-
With the addition of these update lines, we'll be able to use the Nano text exitor in the console when we need to adjust any PHP code.

-
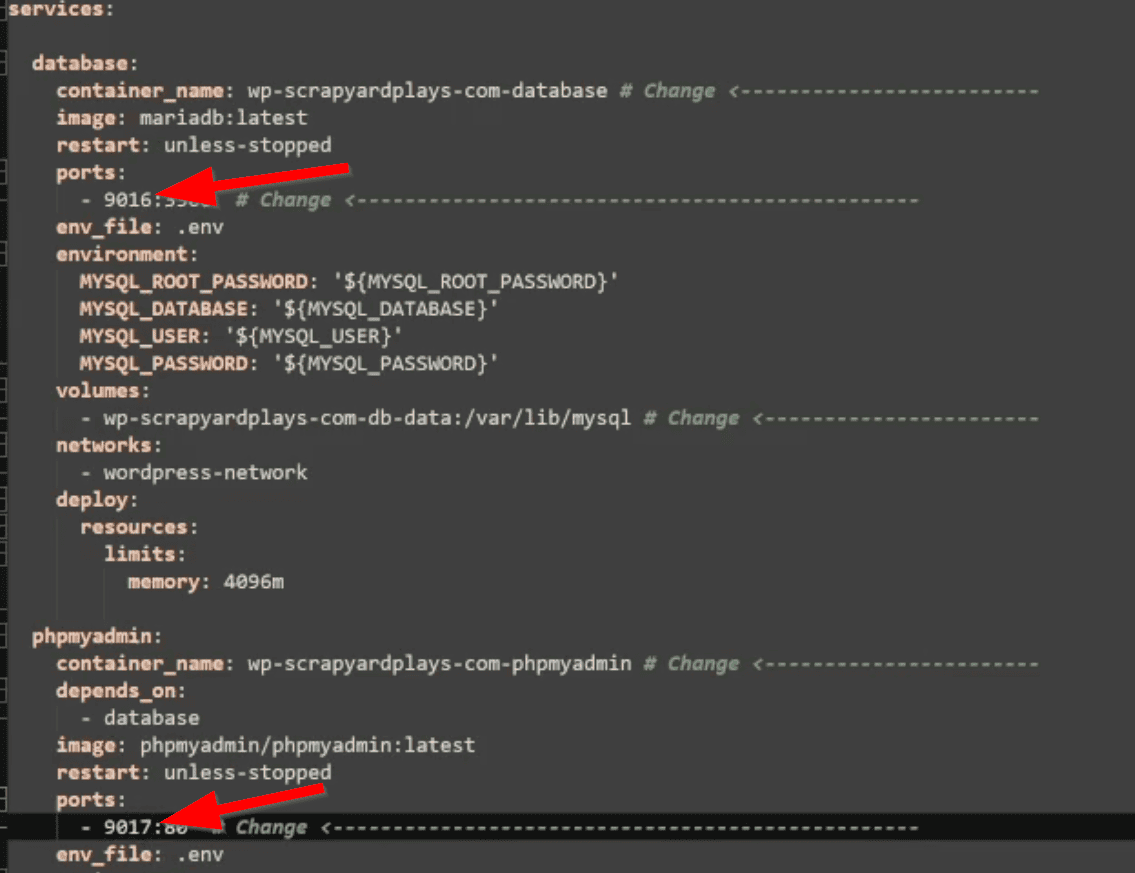
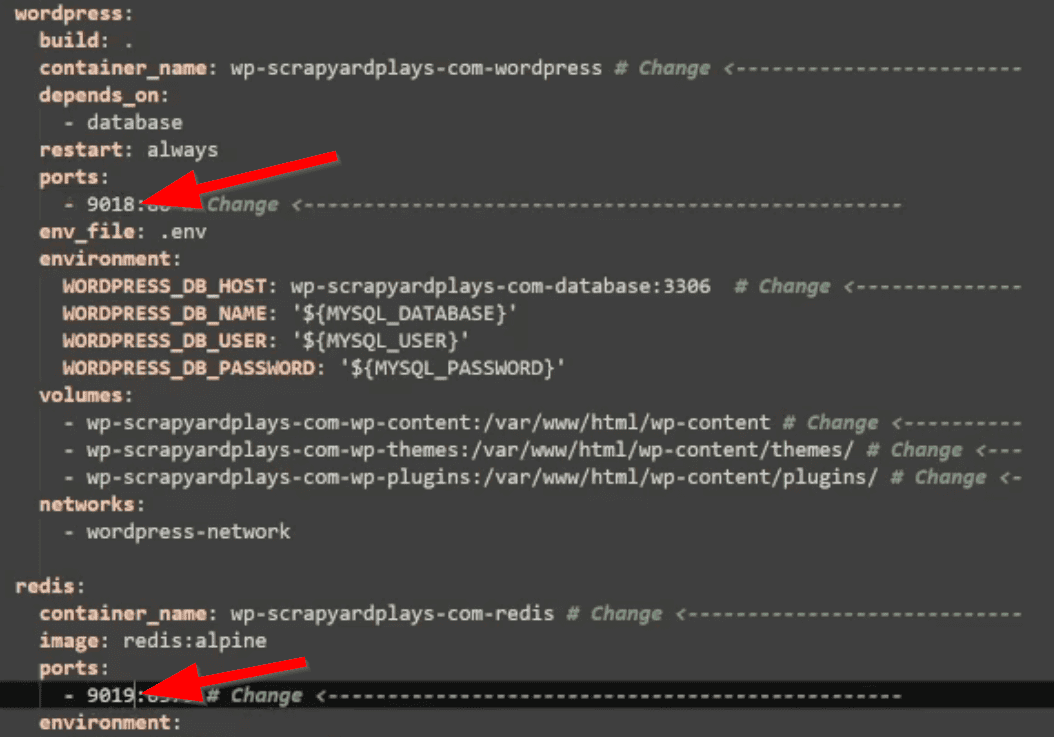
Next you'll be changing the port numbers. Each .yml file will be creating four containers for each website you want to launch
-
For each service inside of the .yml file, change all of the left-ports to something you have available
-
Only change the left-ports and leave the right-ports the same. Ex: database ####:3306, phpmyadmin ####:80, wordpress ####:80, redis ####:6379
-
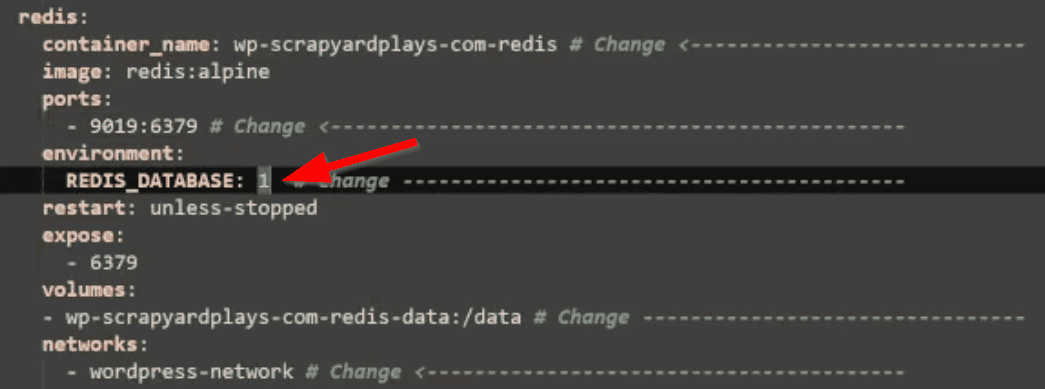
Now under the ' redis ' container, change the REDIS_DATABASE number to match which site this is for you
-
If this is your first site, change it to ' 1 ' . If this is your second site, change it to ' 2 ', etc.
Execute and Test
-
Alrighty. So once you've finished changing the ' wp-new-site ' text, the ports, and the redis database inside of the docker-compose.yml file, save and close it.
-
Now you'll launch it inside PowerShell. Do this by right-clicking in an empty space in the folder where your .yml file is located and select the option ' Open in Terminal '.
-
This will open PowerShell in the that specific directory. Type in this command and hit enter:
docker-compose up -d
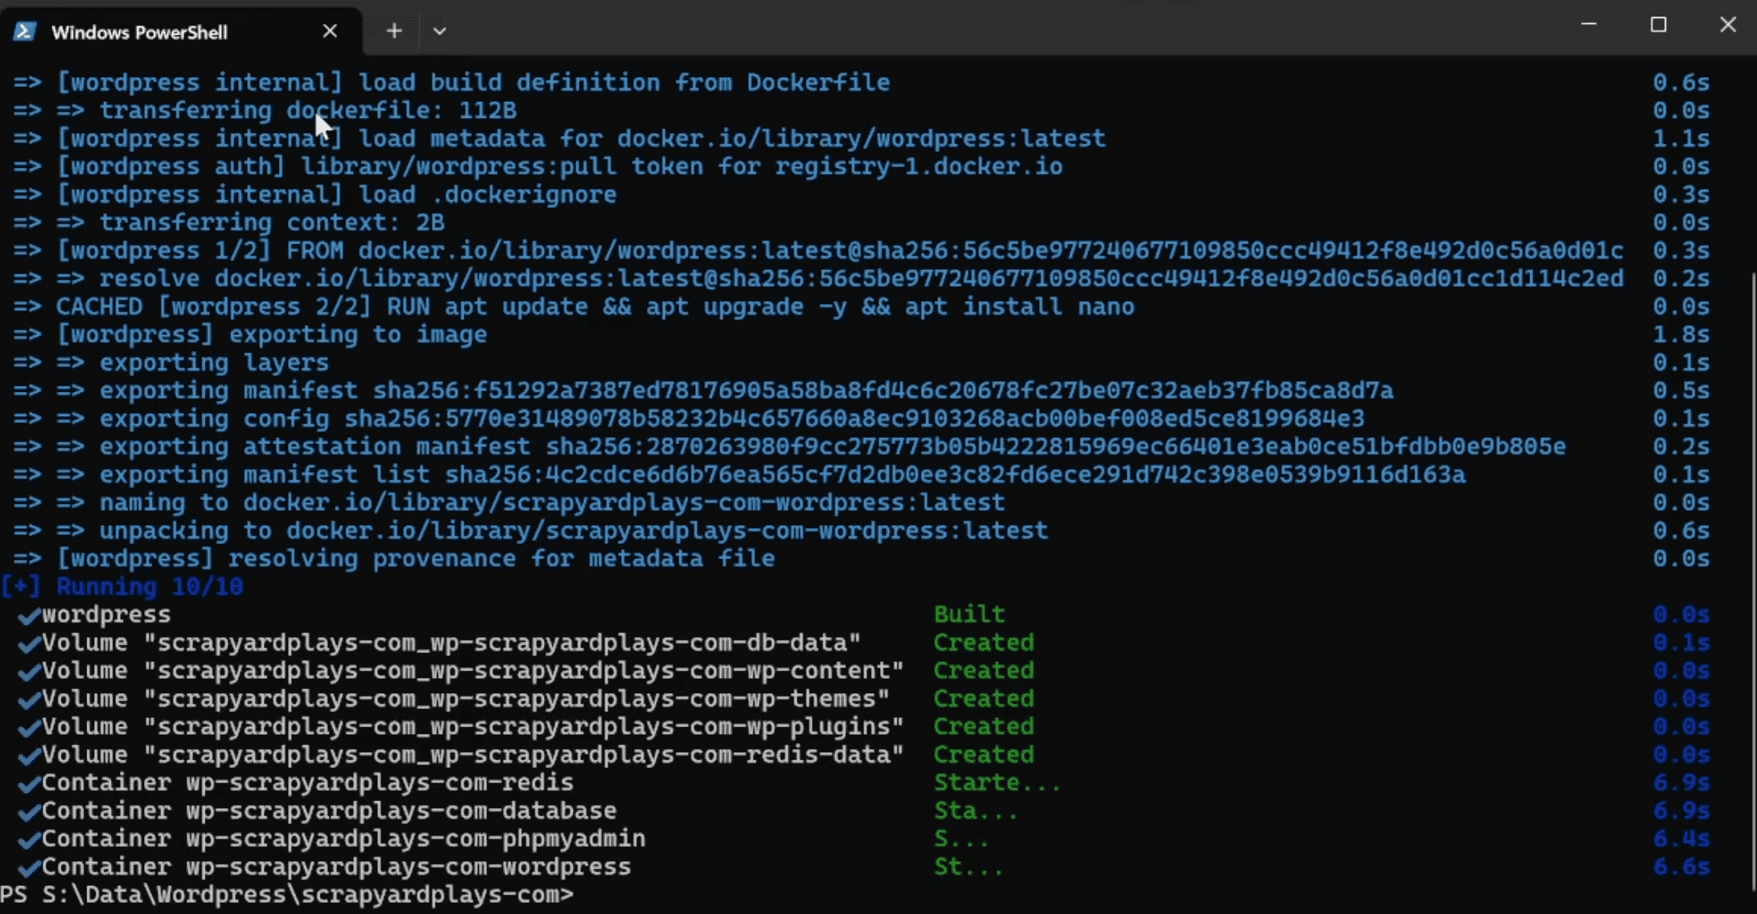
- Docker will pull the images, build the containers, and install everything under it's unique stack name while giving each container a name similar to your website. Also it will attach these containers to the wordpress-network.
-
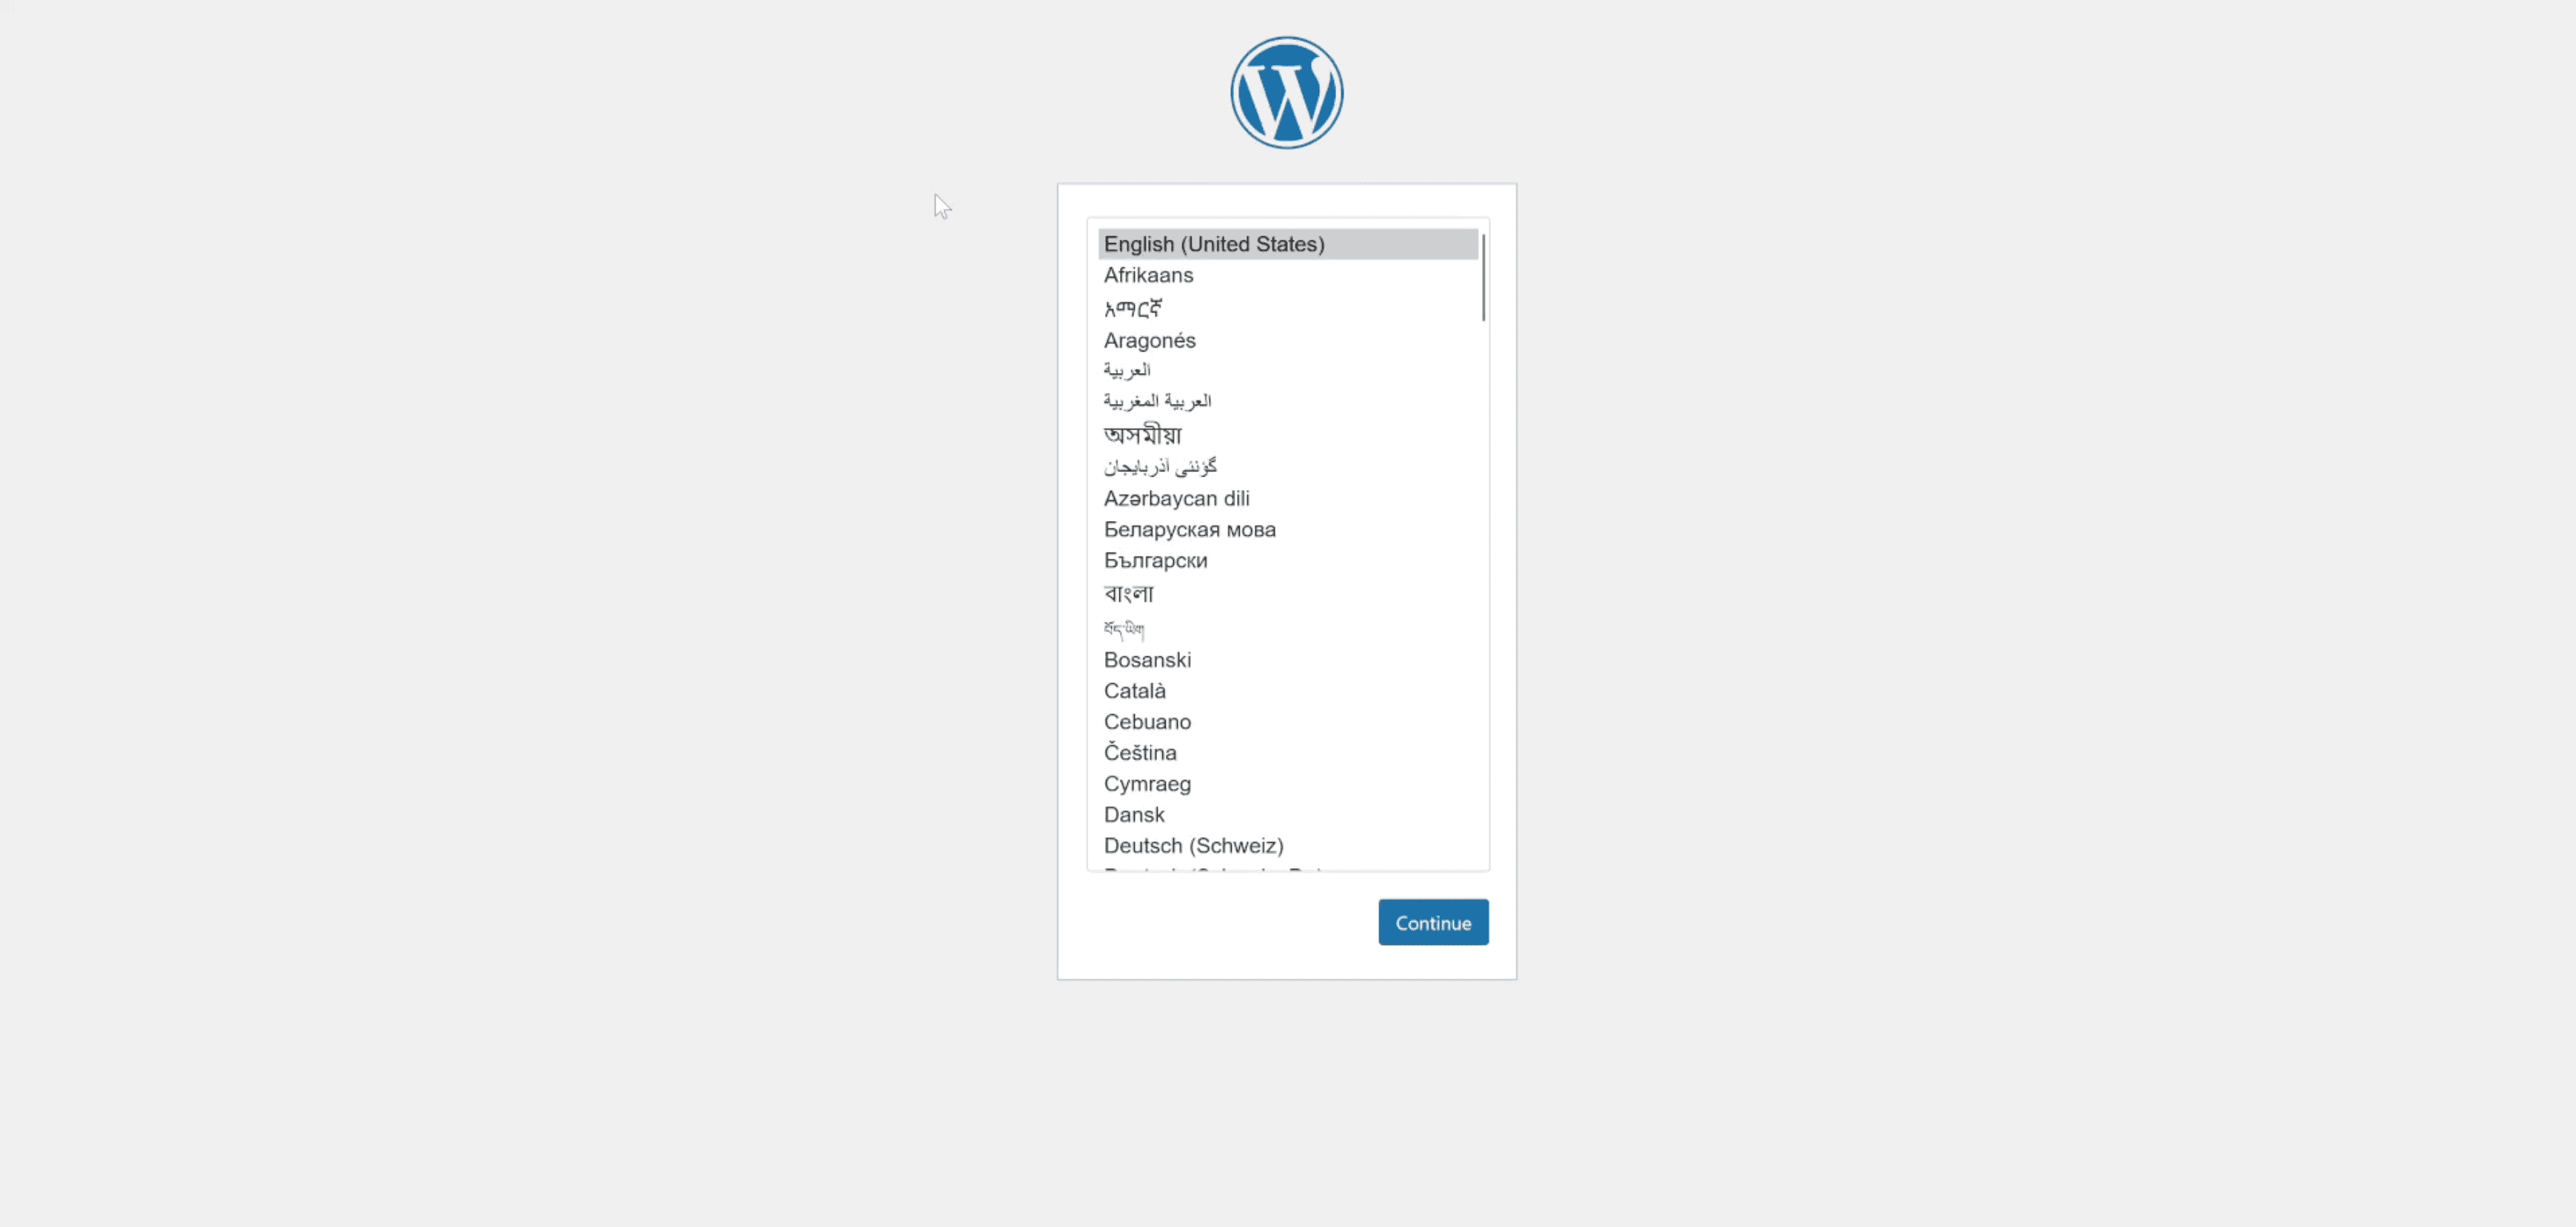
Once it's done, you can now open a browser and go to ' http://localhost:#### ' (replace the #### with whatever port you chose for your Wordpress service/container)
-
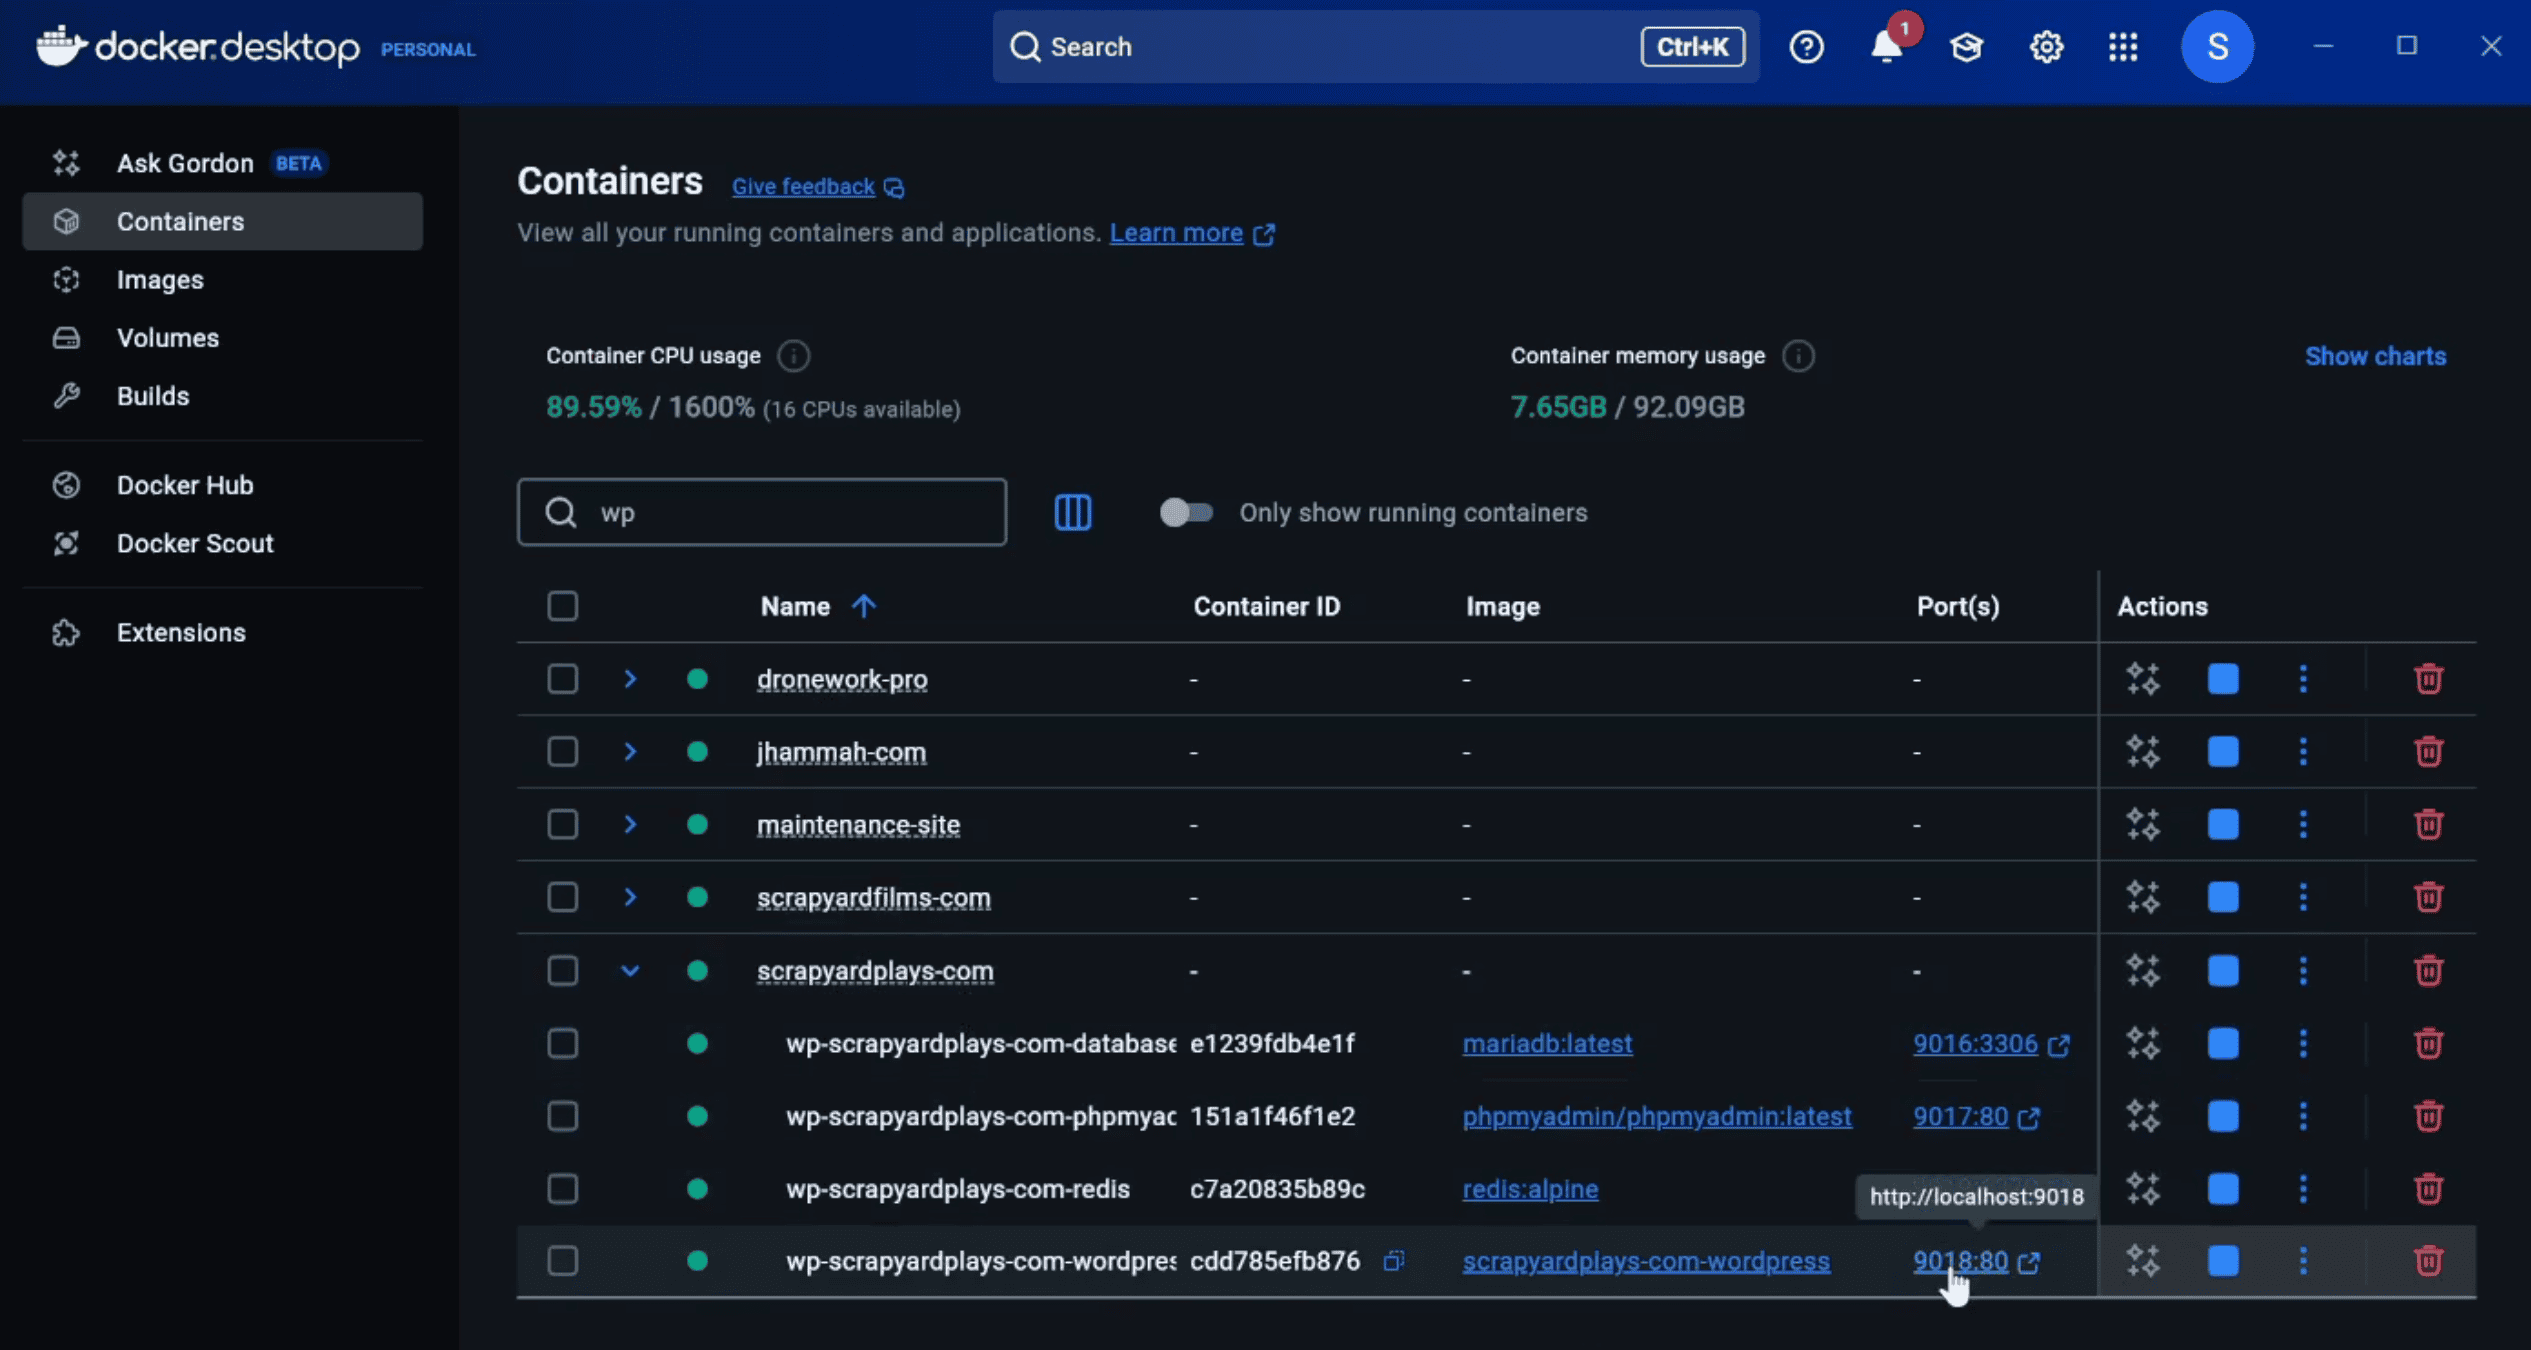
It should take you to the Wordpress setup page to finalize your install. Complete that install and then your locally hosted website will be live!
Reverse Proxy Steps
-
Now it's time to get this website attached to a domain you own as well as link it to it's Redis server to make it super fast
-
**Assuming you own a domain in Cloudflare and are using Caddy as your reverse proxy, the rest of the steps apply to you.
-
**If you're using a different domain host and reverse proxy, these steps will serve as suggestions in which you will need to do research on how to acheive this with your specific setup.
-
Ultimately you'll route your reverse proxy to this localhost:#### container if you want a domain URL to reach it.
-
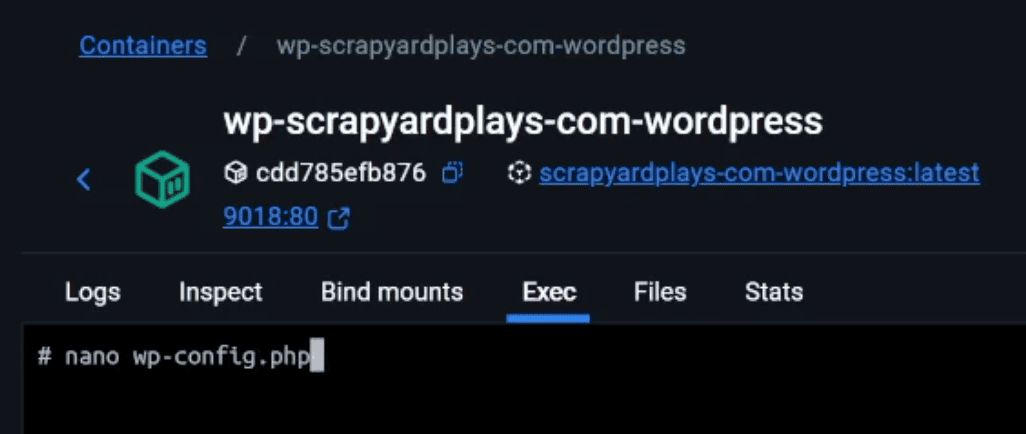
So In Docker, click on your domain's stack, then click the 3 dots next to your wordpress container and select 'Open in Terminal'

- This will launch your container's Linux terminal in which you can navigate and make changes like you would to in a Linux environment.
wp-config.php configuration
- **Enter this command and it will have you start editing the wp-config.php file: **
nano wp-config.php
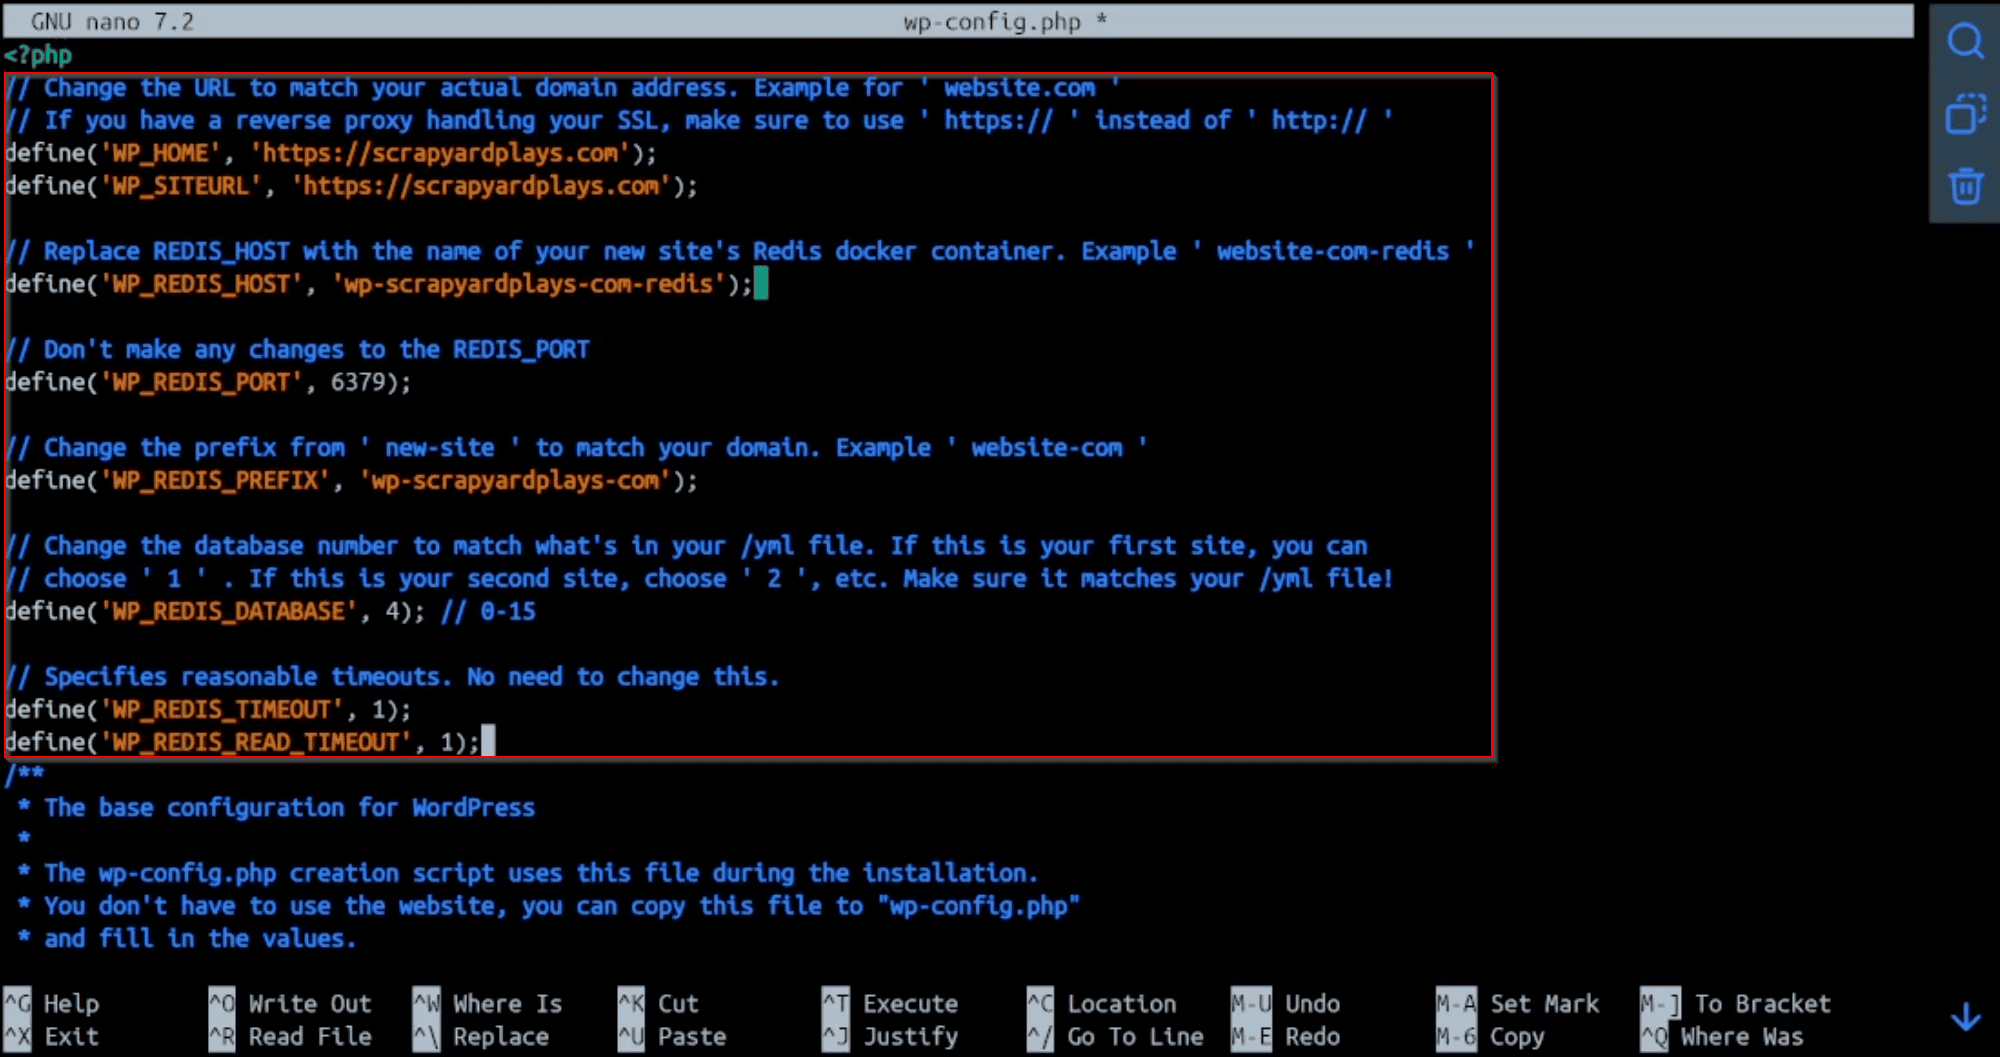
- Here is the code that you will copy/paste into this config file. You'll want to make the changes as I notate to match what your website name is as well as the Redis server #
// Change the URL to match your actual domain address. Example for ' website.com '
// If you have a reverse proxy handling your SSL, make sure to use ' https:// ' instead of ' http:// '
define('WP_HOME', 'http://website.com');
define('WP_SITEURL', 'http://website.com');

// Replace REDIS_HOST with the name of your new site's Redis docker container. Example ' website-com-redis '
define('WP_REDIS_HOST', 'wp-new-site-redis');

// Don't make any changes to the REDIS_PORT
define('WP_REDIS_PORT', 6379);

// Change the prefix from ' new-site ' to match your domain. Example ' website-com '
define('WP_REDIS_PREFIX', 'wp-new-site');

// Change the database number to match what's in your /yml file. If this is your first site, you can
// choose ' 1 ' . If this is your second site, choose ' 2 ', etc. Make sure it matches your /yml file!
define('WP_REDIS_DATABASE', 0); // 0-15

// Specifies reasonable timeouts. No need to change this.
define('WP_REDIS_TIMEOUT', 1);
define('WP_REDIS_READ_TIMEOUT', 1);
-
Here is what my code looks like with scrapyardplays.com as my domain and telling Redis that this is my 4th website
-
Once you've made the changes, hold Control+X to exit. It will prompt you to save the changes and you select Yes
- **Now you WILL NOT be able to reach your website unless you access it via the specified domain so you'll need **
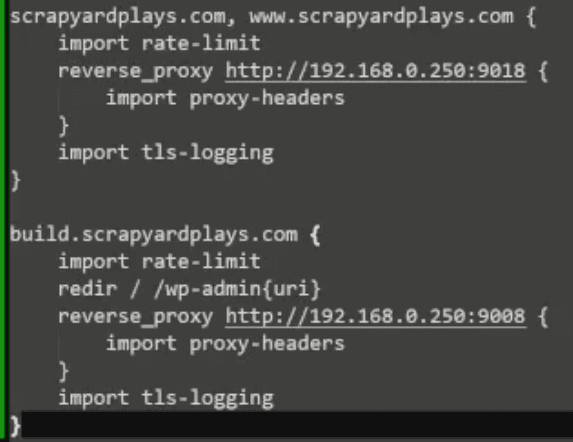
Caddyfile configuration
- Caddyfile configuration
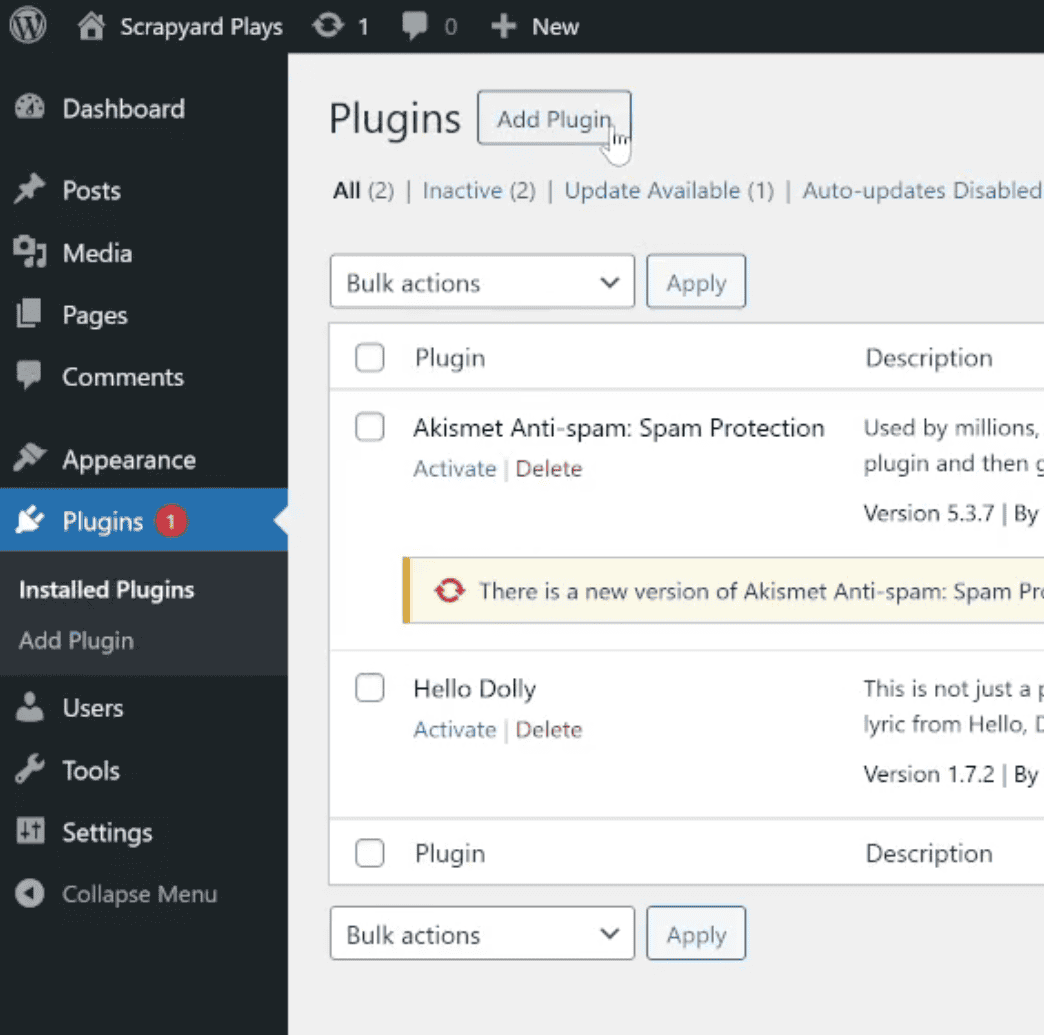
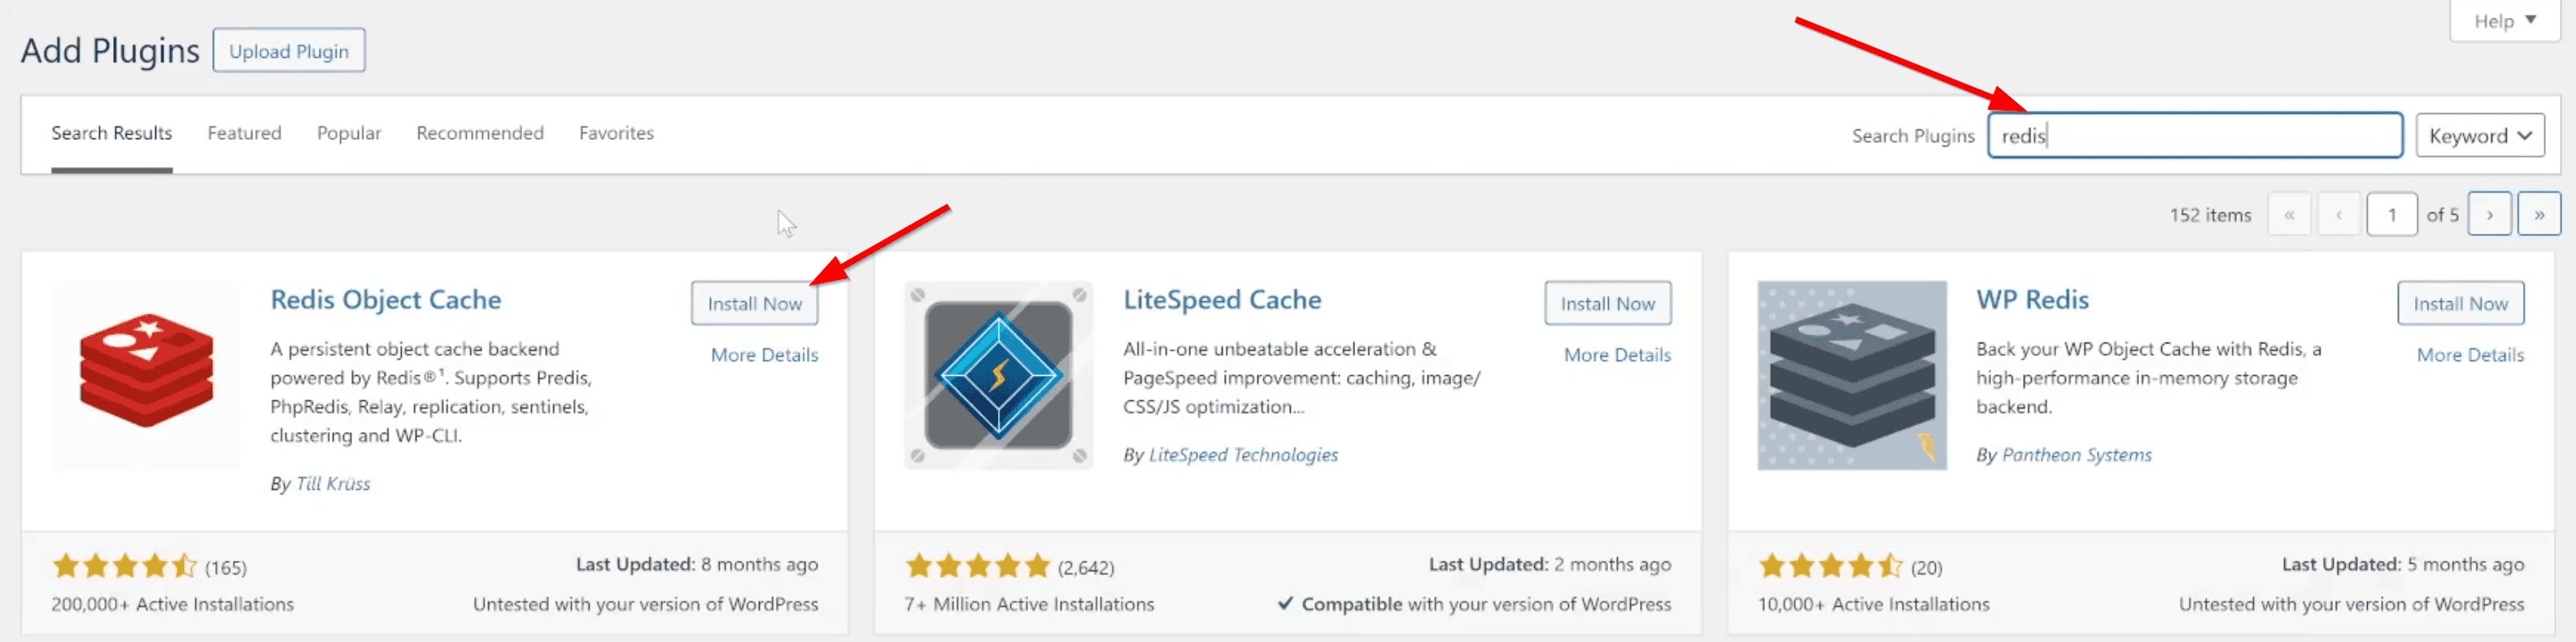
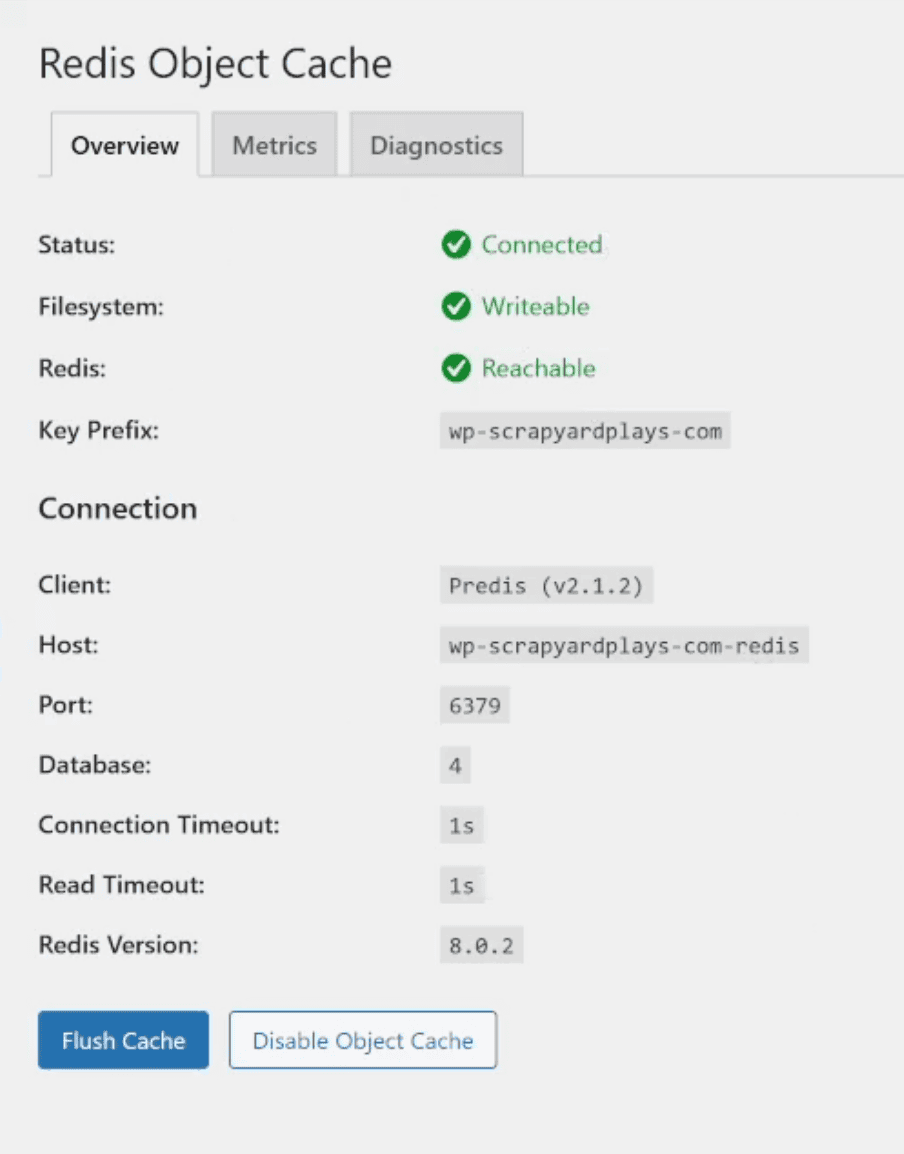
Redis Plugin
- Redis Plugin

Final Test
- Final test