![]()
![]()

![]()
![]()
Install Stalwart Mail Server and protect it with HAProxy (and Caddy) inside Docker Desktop on Windows 11
Navigation
Prerequisite
Here are all the things you need to make sure you have before starting this tutorial. I'll eventually be adding links to other relevant tutorials that I create to assist you in completing this tutorial.
1. You should already have Caddy with the cloudflare package installed and fully working.
2. You should already have a Cloudflare account managing your domain.
3. You should already have a Cloudflare API Token.
4. You should already have the CNAME records 'mail.yourdomain.com' & 'webmail.yourdomain.com' created.
5. You should already have your Caddyfile routing 'mail.yourdomain.com' to port 8404.
6. You should already have your Caddyfile routing 'webmail.yourdomain.com' to port 680.
7. You should already have an SMTP2GO account created and setup.
8. You should use an advanced text editor like Notepadd++ or something like it that's designed for coding.
9. You should already have ports 25, 80, 110, 143, 443, 465, 587, 993, & 4190 opened inside your router pointing to your host machine's IP address.
Installation
-
The flow of this Git tutorial will be following closely to the video tutorial I created. The video will have a lot more explainations and information so be sure to follow along here: https://www.youtube.com/watch?v=VsNb3Egw6BE
-
The password to extract all of the tutorial files from the zip file is: JHammaH
docker-compose.yml file
-
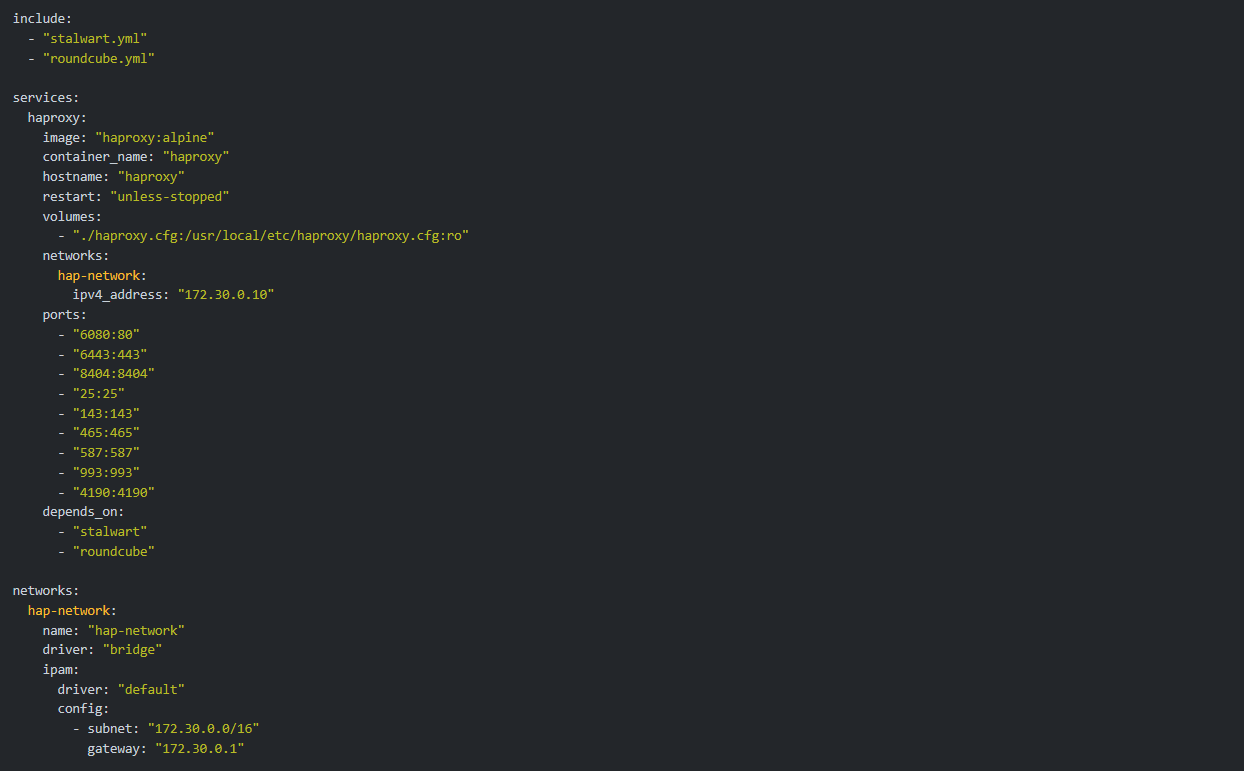
This is the docker-compose.yml file that you will use to create your container. It will be installing HAProxy and then including Stalwart and Roundcube's yml files, installing them afterwards.
-
The container will be named "haproxy"
-
It's always going to restart unless we manually stop it.
-
It's volume where the haproxy.cfg file is located will be mapped to the current directory of the yml file.
-
We are adding this container to a custom network called "hap-network" that we'll create below. It's also being assigned a static IP address.
-
Ports 25, 80, 110, 143, 443, 465, 587, 993, & 4190 will be assigned and mapped to this container
-
We're also making HAProxy's container depend on Stalwart's container
-
And finally we are creating a custom "hap-network" for all of these containers.
-
If you need to make any changes of IP's or ports, you can do so in this file. If you're good with the assigned IP's and ports, then this file should be ready to rock n roll.
stalwart.yml file
- This is the stalwart.yml file where we define all the differnt aspects of how we want this container to be built.
~ IMPORTANT NOTE ~ Due to Stalwart updating their image, I've made some adjustments in the yml file that you can download. It will look a little different than what is in the video but it will work better.
-
The container will be named "stalwart"
-
It's always going to restart unless we manually stop it.
-
Port 7080 will be assigned and mapped to this container (instead of 8080 since 8080 is in use already) which is where you can access the Admin UI.
-
Stalwart's volume for its data files will be mapped to the current directory of the yml file.
-
We are adding this container to our custom "hap-network" and assign it a static IP address.
-
If you need to make any changes of IP's or ports, you can do so in this file. If you're good with the assigned IP's and ports, then this file should be ready to rock n roll.

roundcube.yml file
-
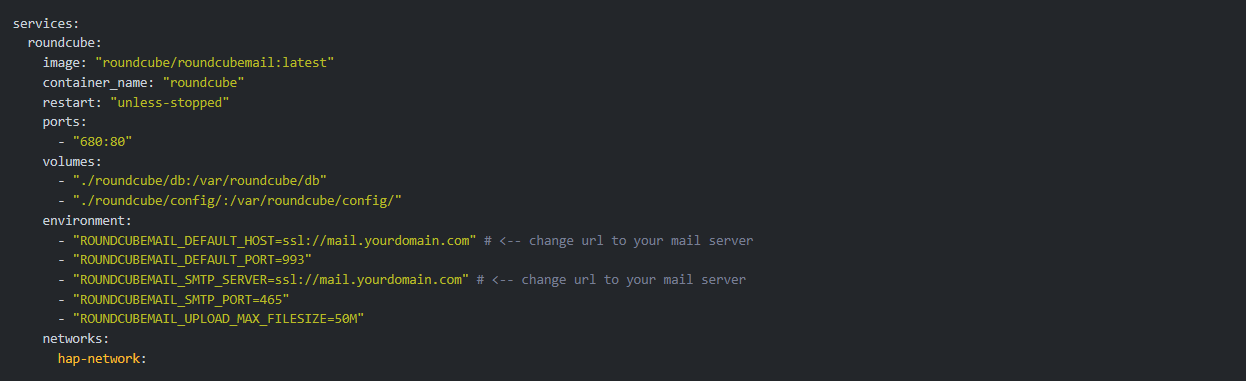
This is the roundcube.yml file. It's not required but very recommended as it's a great email client container that you can use for quick testing.
-
The container will be named "roundcube"
-
It's always going to restart unless we manually stop it.
-
Port 680 will be assigned and mapped to this container (instead of 80 since 80 is in use already) which is where you can access the UI.
-
Roundcube's volumes for its database and config files will be mapped to the current directory of the yml file.
-
Roundcube's default Host and Servers need to be changed to the URL your mail server will be reached.
-
We are adding this container to our custom "hap-network".
-
If you need to make any changes of IP's or ports, you can do so in this file. If you're good with the assigned IP's and ports, then this file should be ready to rock n roll.
Once you've made all of the yml files and they are sitting in the same directory, you can right-click in an empty space in the folder where all your files are located and select 'Open in Terminal'.
That opens a Powershell window inside that direcotry where you can enter this code to launch everything.
docker-compose up -d
Configurations
Stalwart UI First Logon and Configuration
-
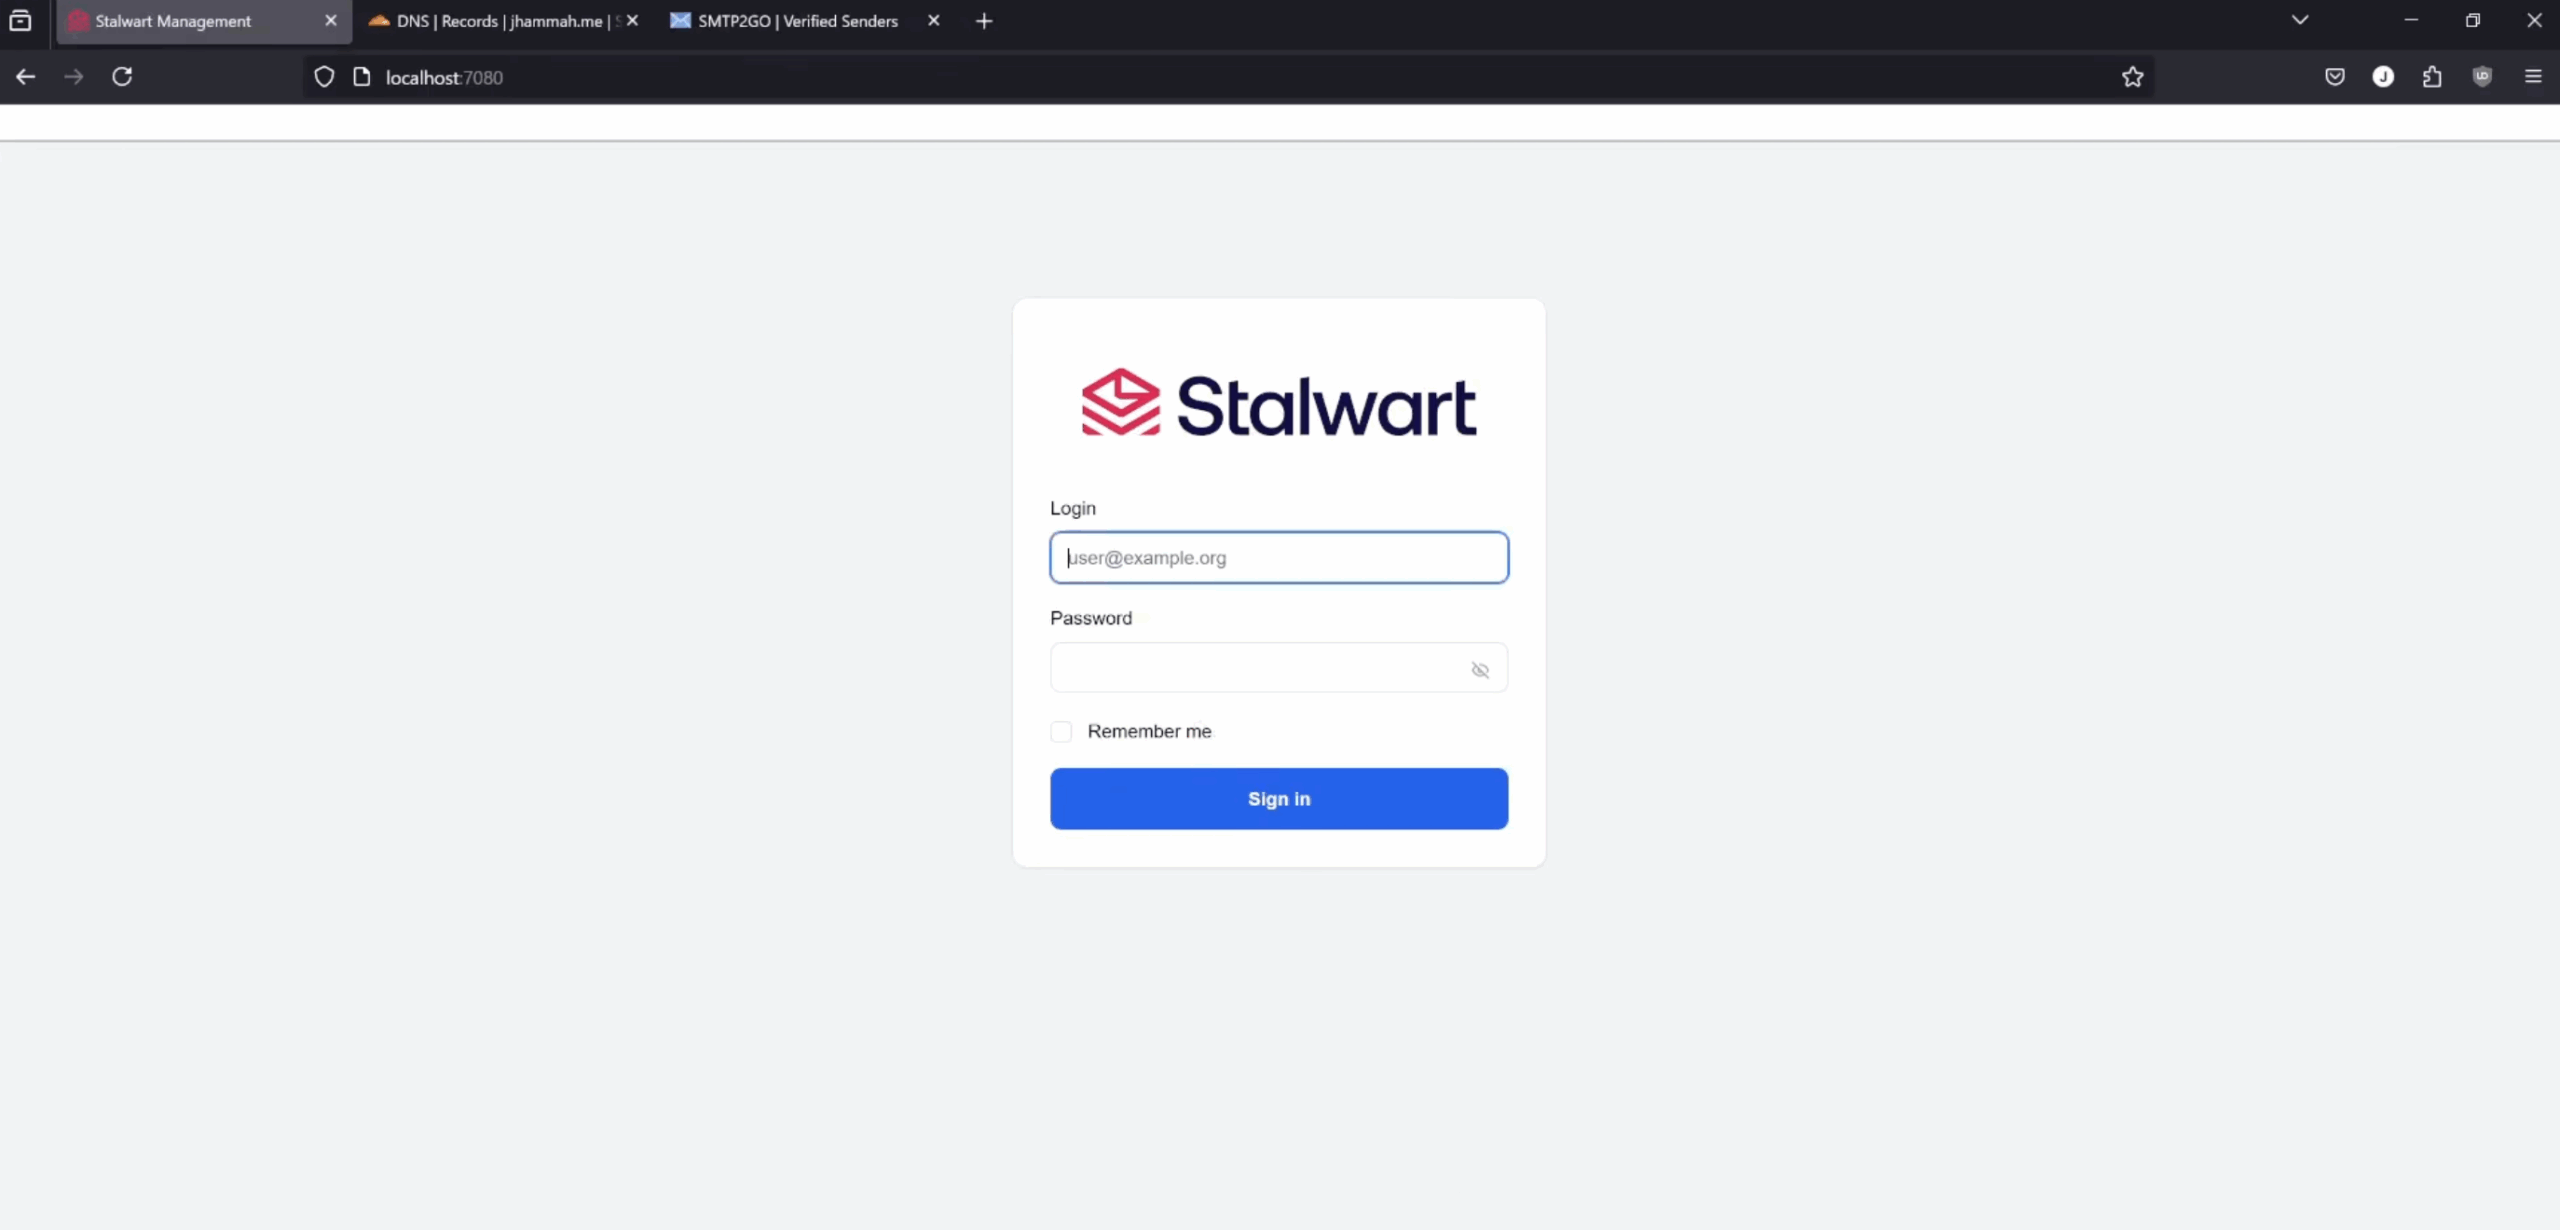
Once you've ran and built the HAProxy, Stalwart, and Roundcube containers, let's load up Stalwart's Admin UI by going to http://localhost:7080
-
If you check the Docker Logs of the Stalwart container, you'll see the initial login credentials provided right there. Log in using those.
-
Now we can performa few tests to verify everything works.
-
Setting > Authentication > Settings. Make a Fallback Administrator. Save & Reload
-
Security > Allowed IP's. Add your hap-network as an Allowed IP range. Save & Reload
-
SMTP > Outbound > Relay Host. Add SMTP2GO information. Save & Reload
-
SMTP > Outbound > Routing. Add 'SMTP2GO' . Save & Reload
-
SMTP > Outbound > TLS. Disable DANE and MTA-STS. Save & Reload
-
Server > Network. Add your mail server's URL as the Hostname. Save & Reload
-
Click + Add and add the hap-network as a proxy network. Save & Reload
Configuring Caddyfile
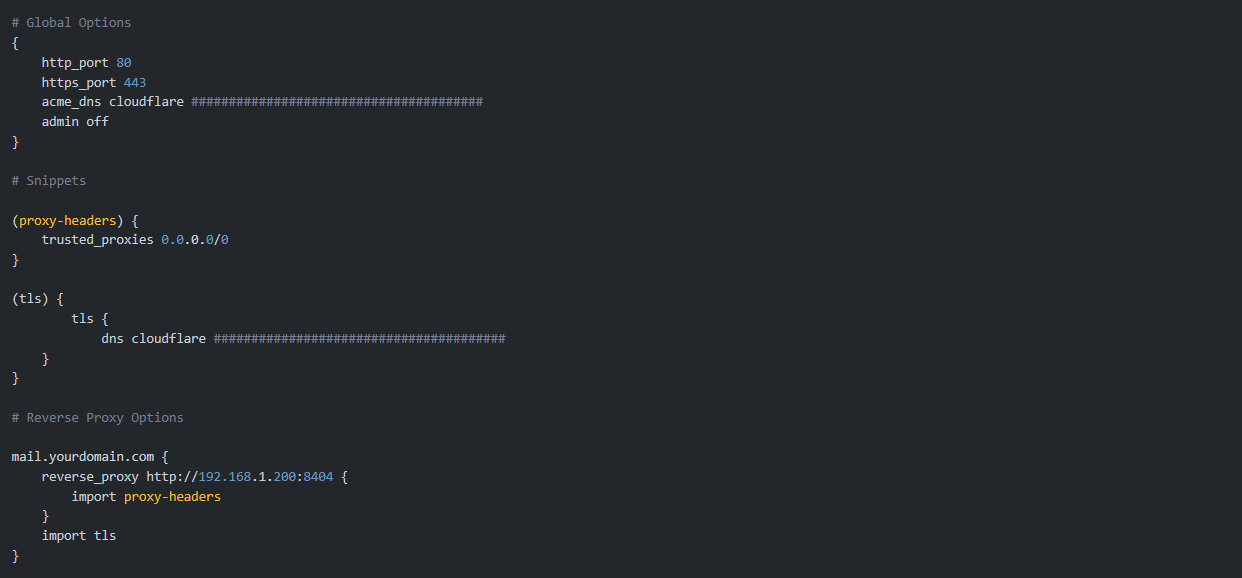
- This is an example of a working Caddyfile. This file tells Caddy what and how to do things. Make the appropriate changes and save it. Then restart Caddy so the changes can be applied.
~ IMPORTANT NOTE ~ Due to Stalwart updating their image, I've made some adjustments in the Caddyfile that you can download. It will look a little different than what is in the video but it will work better.
- If you changed any IP's or ports in the yml files, they would need to be updated here. Otherwise, this file should be ready to rock n roll.
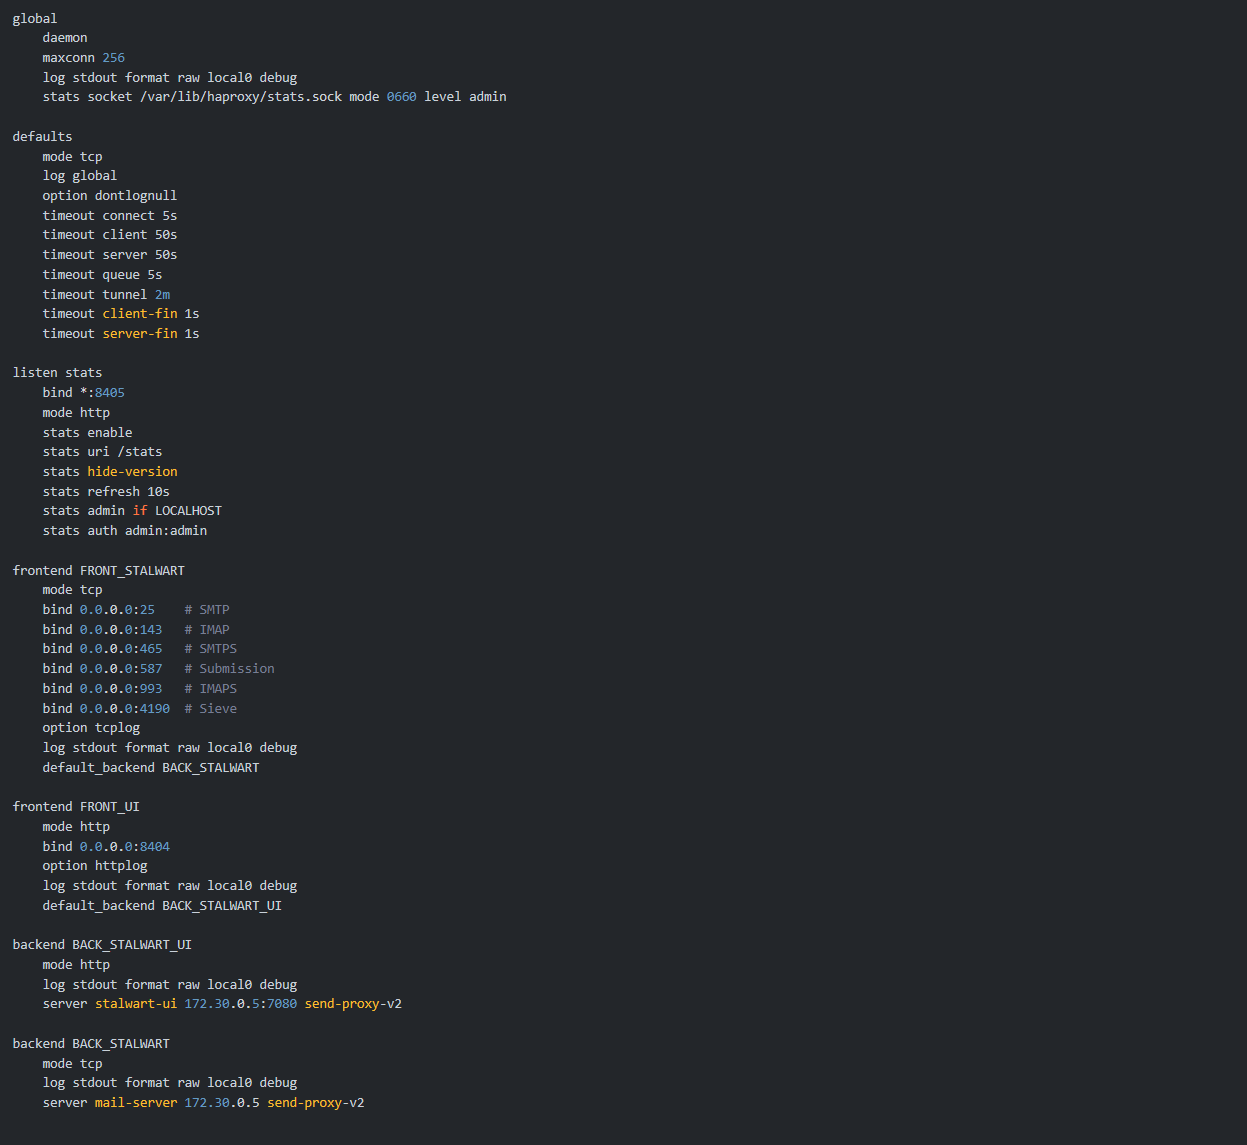
Configuring haproxy.cfg file
- This is HAProxy's configuration file which tells HAProxy what and how to do everything.
~ IMPORTANT NOTE ~ Due to Stalwart updating their image, I've made some adjustments in HAProxy's configuration file that you can download. It will look a little different than what is in the video but it will work better.
- If you changed any IP's or ports in the yml files, they would need to be updated here. Otherwise, this file should be ready to rock n roll.
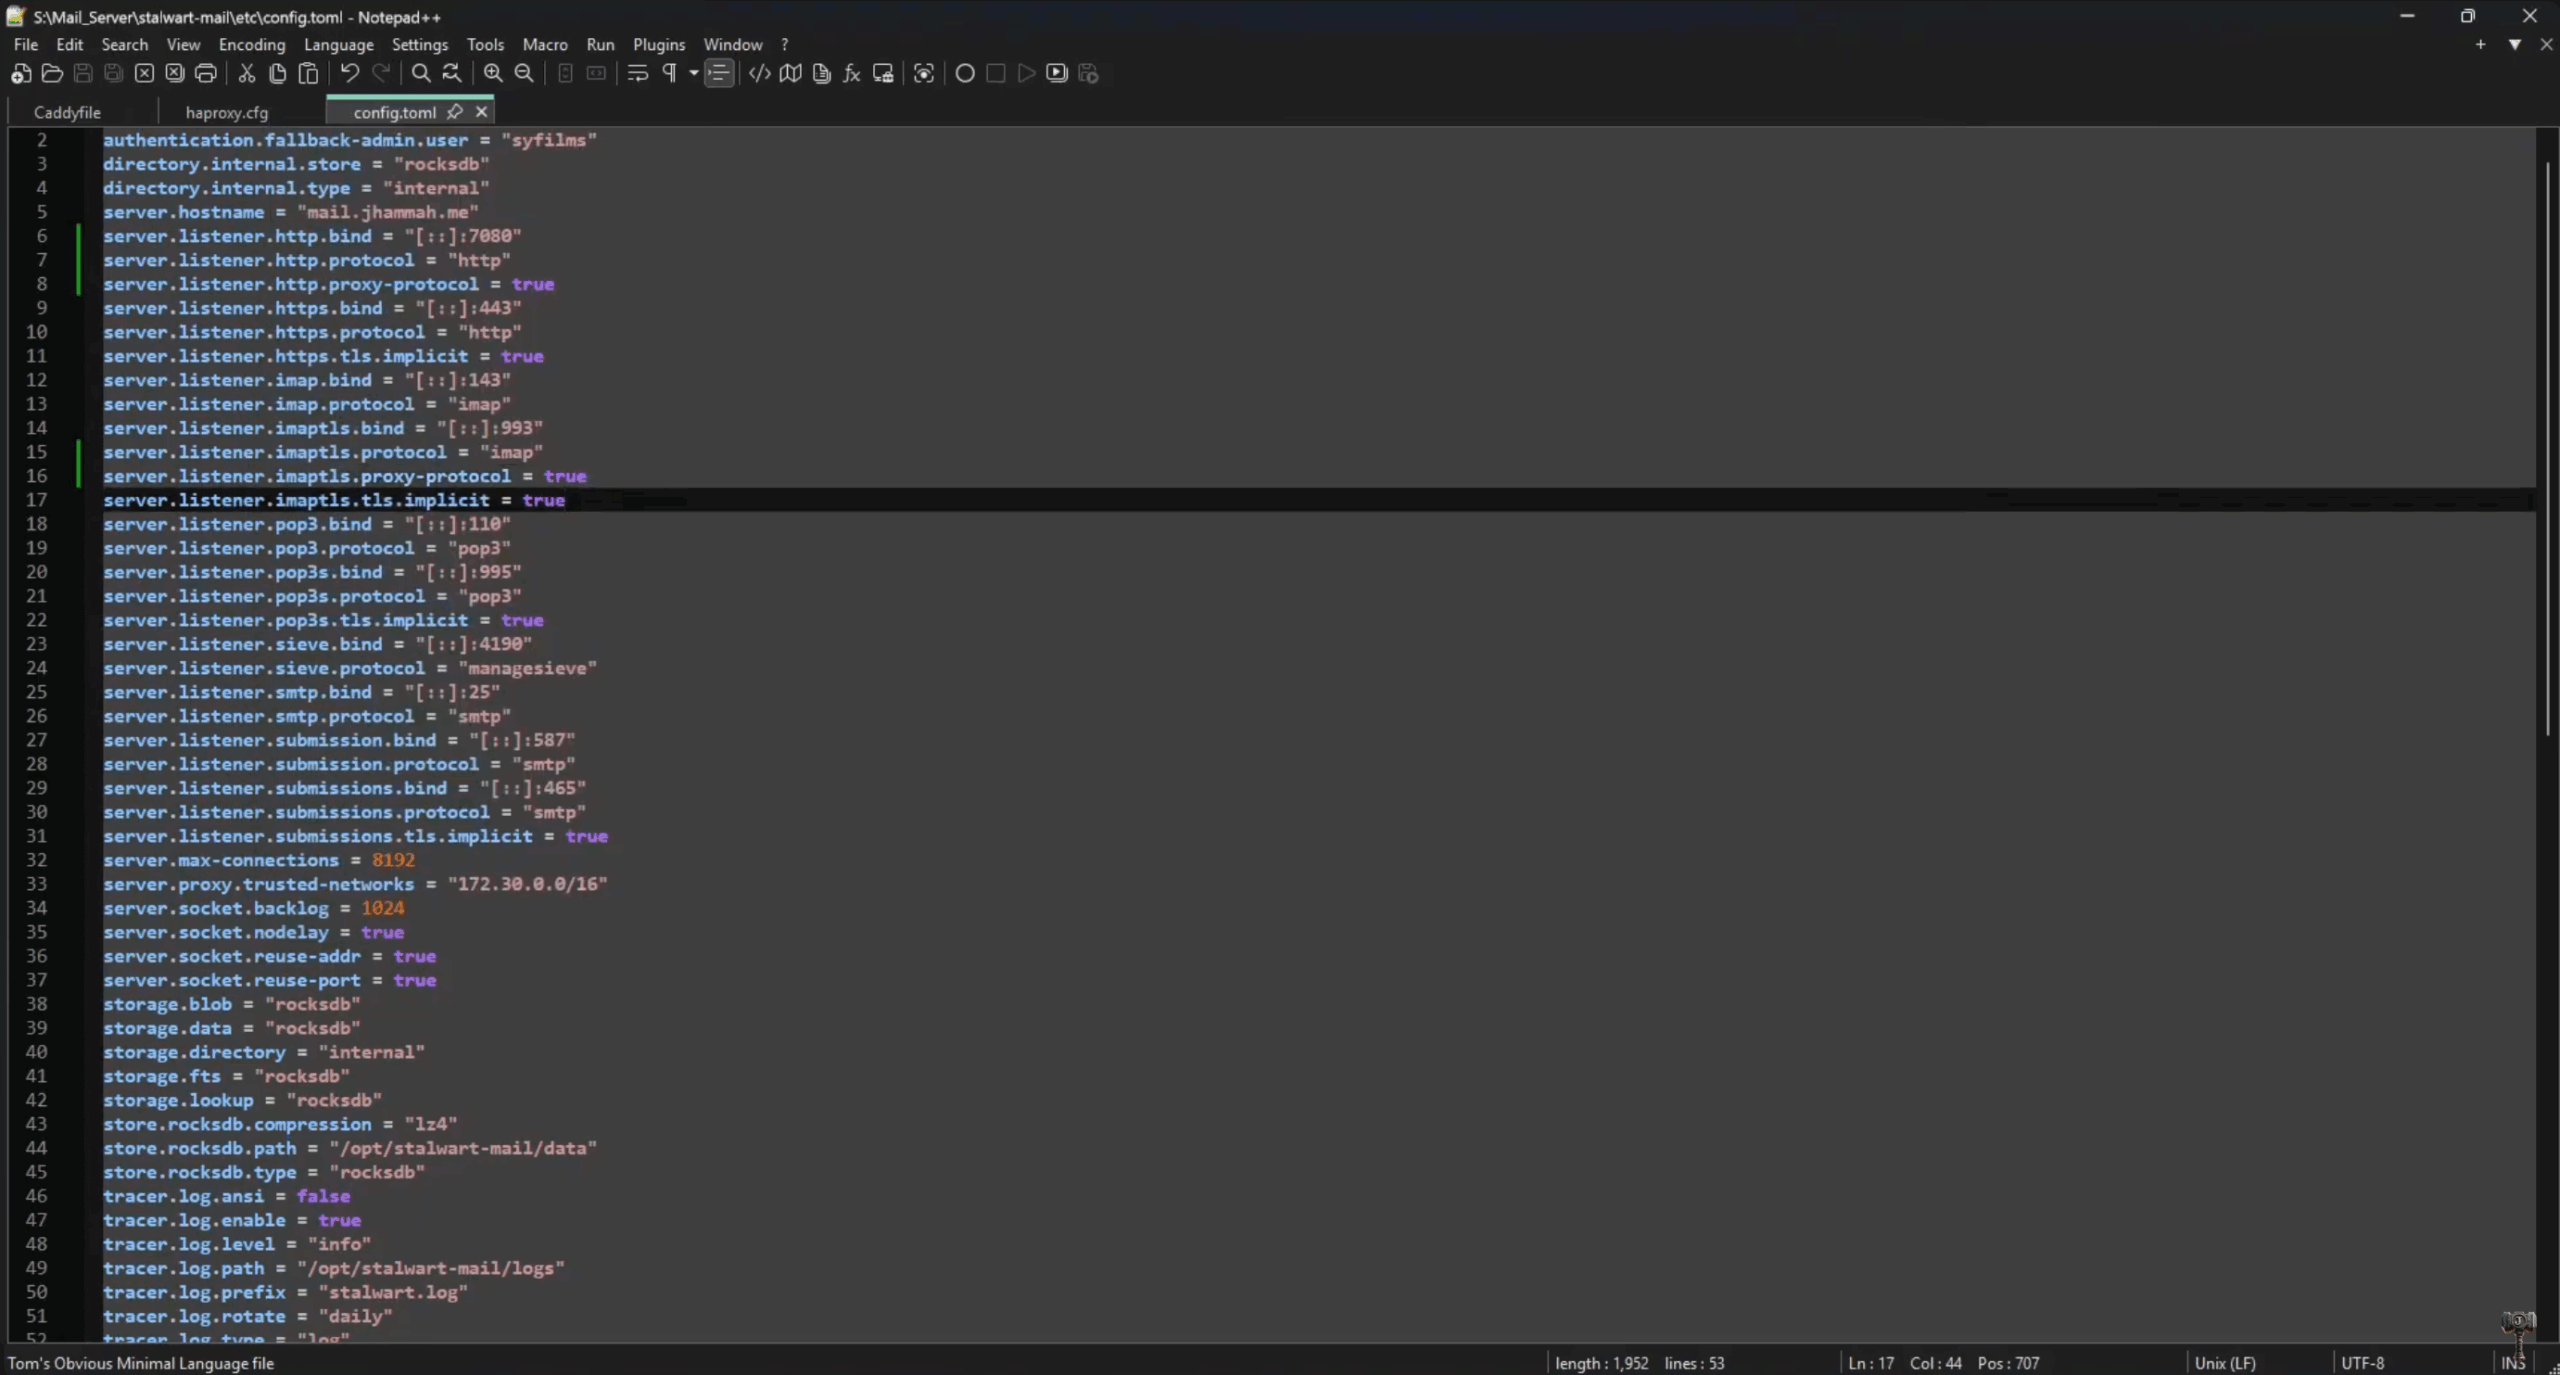
Configuring Stalwarts .toml file
-
This is Stalwart's TOML file. Basically its configuration file. Here is where you can make any changes without going through the UI. This file is important because you can make changes in here that you CANNOT make in the UI, too.
-
Update the server listener http bind port to 7080
-
Tell Stalwart to listen to http proxy protocols
-
Tell Stalwart to listen to imap tls proxy protocols
-
Save the file and restart the Stalwart container.
-
After making all the changes so far, you'll now ONLY be able to get to Stalwart's Admin UI and Mail Server via the subdomain you chose. Caddy will route your subdomain request to port 8404. HAProxy will be listening to port 8404 and then route it to 7080.
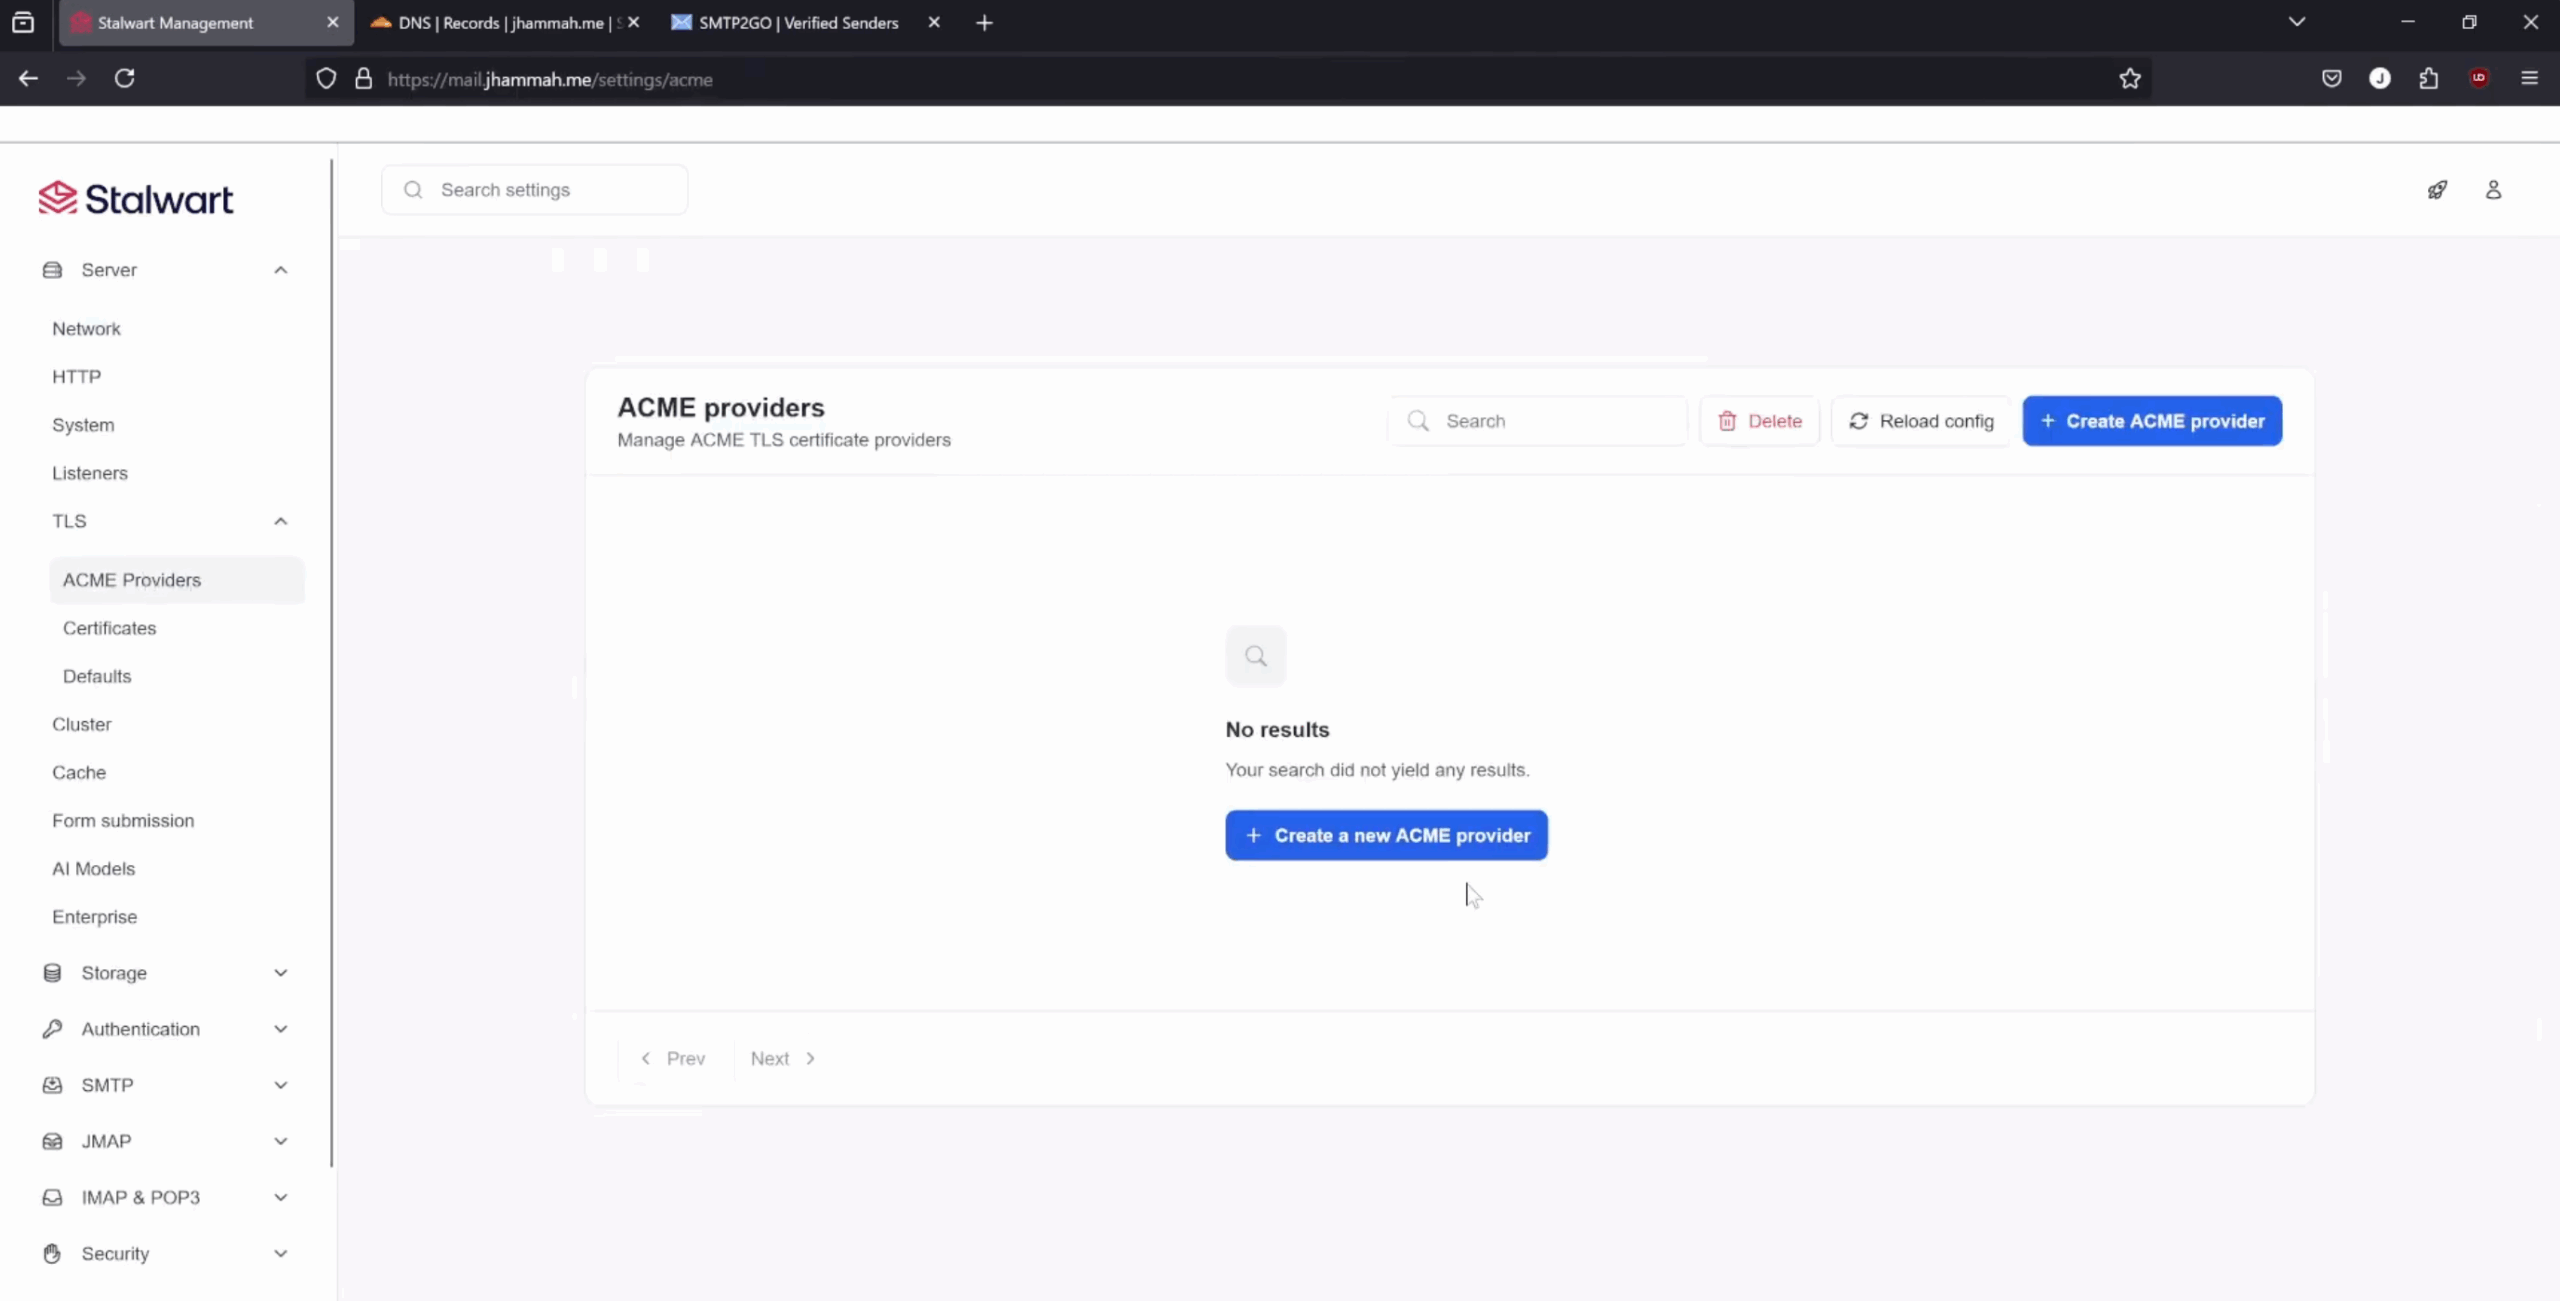
Stalwart UI SSL Configuration
-
Settings > TLS > ACME Providers. and make the following changes.
-
Directory ID: lets
-
Challenge type: DNS-01
-
Contact type: something@yourdomain.com
-
Contact email: mail.yourdomain.com
-
DNS Provider: Cloudflare
-
Secret: your_whole_cloudflare_api_token
-
Save & Reload. Then restar the Stalwart container.
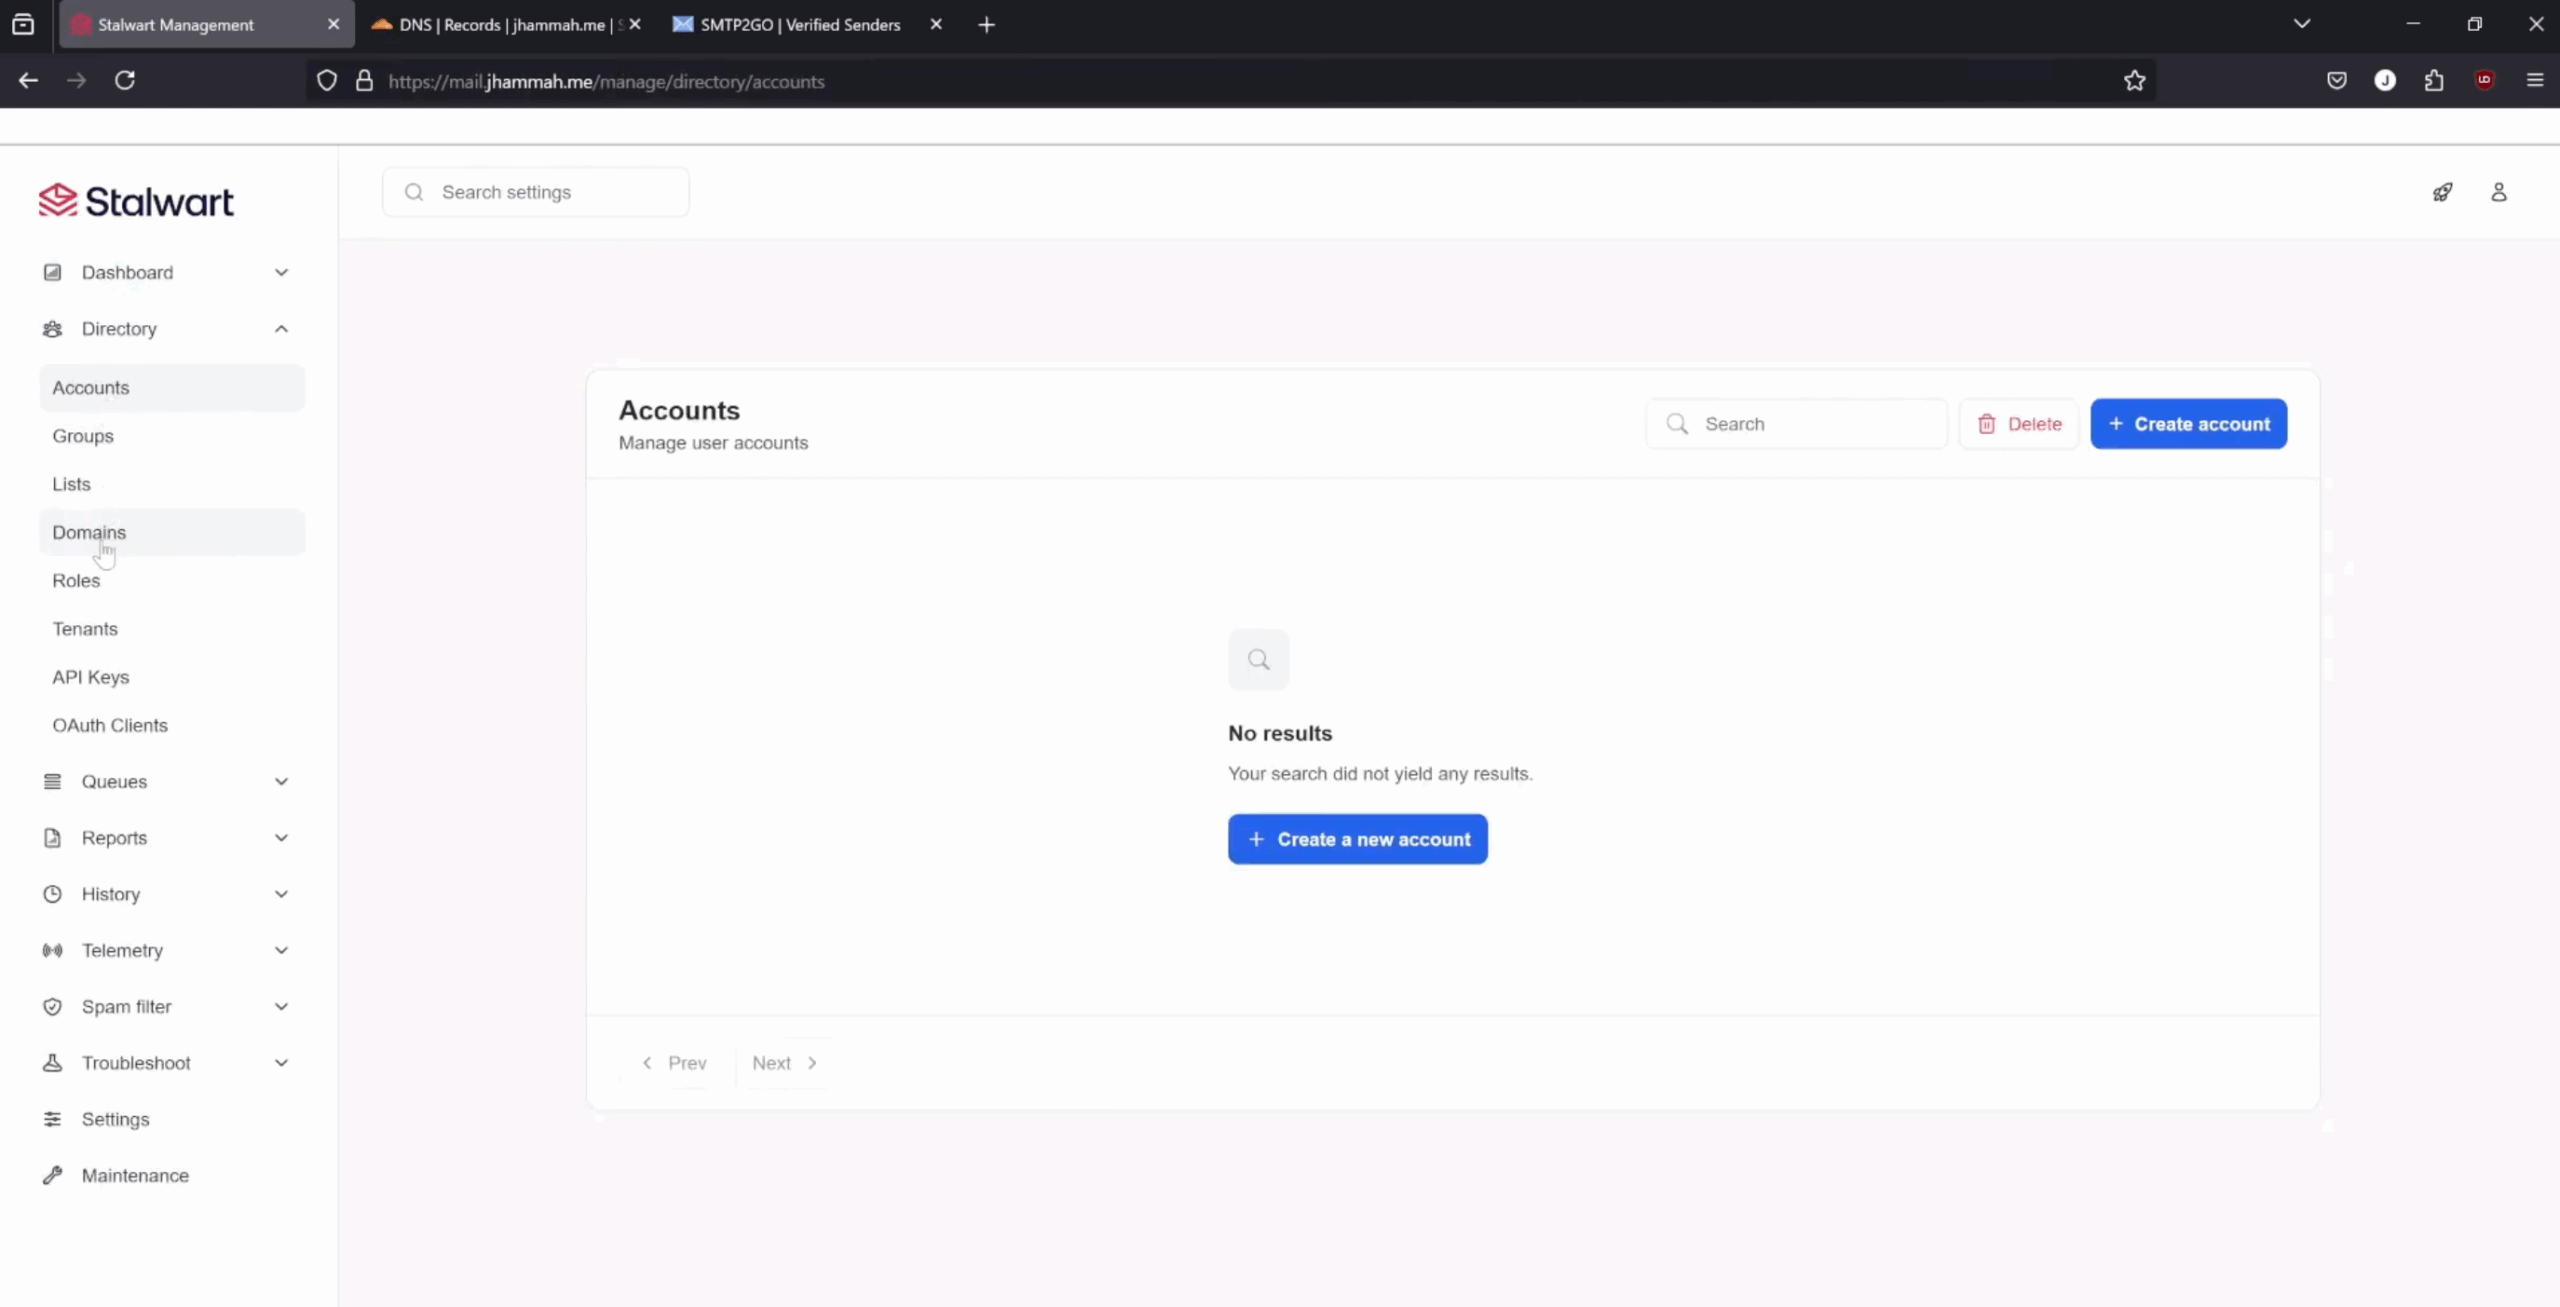
Stalwart UI Domain Configuration
-
Management > Directory > Domains and Create a new account.
-
Domain name: yourdomain.com > Save changes
-
Next to yourdomain.com, click the 3 dots and select View DNS Records.
-
Copy everything under Zonefile and paste it into the blank txt file I provided in the download.
-
Upload that Zonefile to Cloudflare's DNS records for your domain.
-
Management > Directory > Accounts and Create a new account.
-
Login name: something@yourdomain.com
-
Name: Whatever you want your name to be
-
Email: something@yourdomain.com
-
Authentication > Password: something secure
-
Save Changes.
Testing Mail Flow
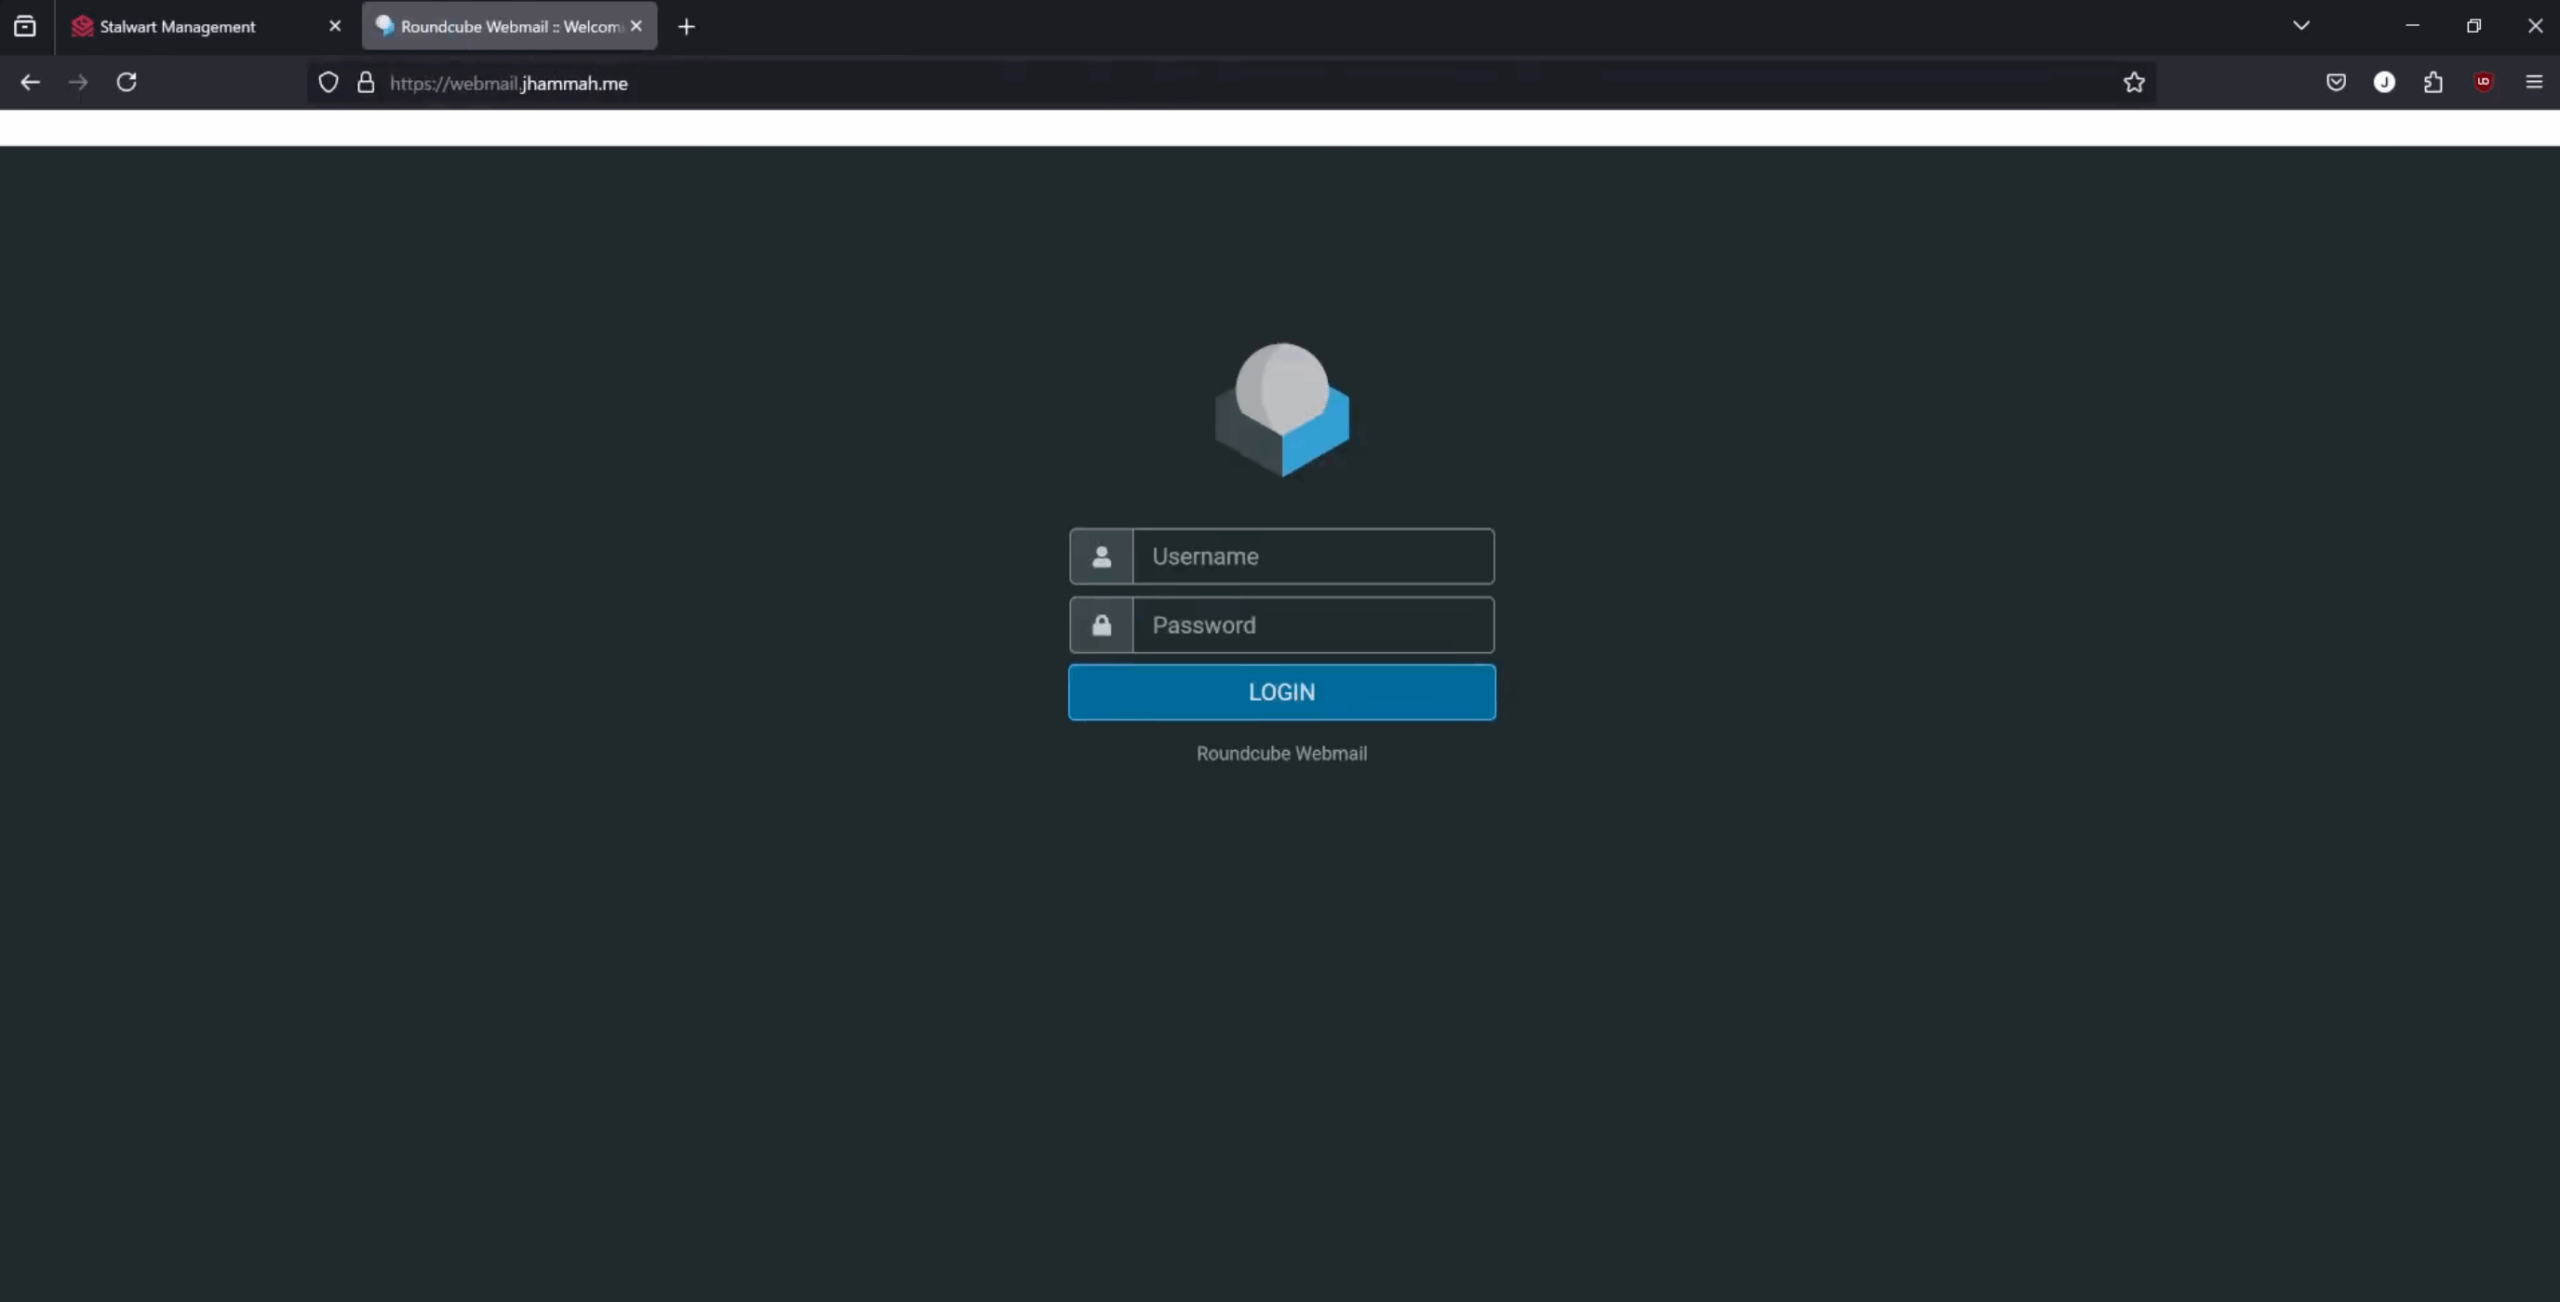
Now we can performa few tests to verify everything works. First thing you'll want to do is log into an email client with your new email address and password. That's what we have Roundcube for. If you followed the instructions up to this point then you should be able to log into Roundcube's UI at webmail.yourdomain.com
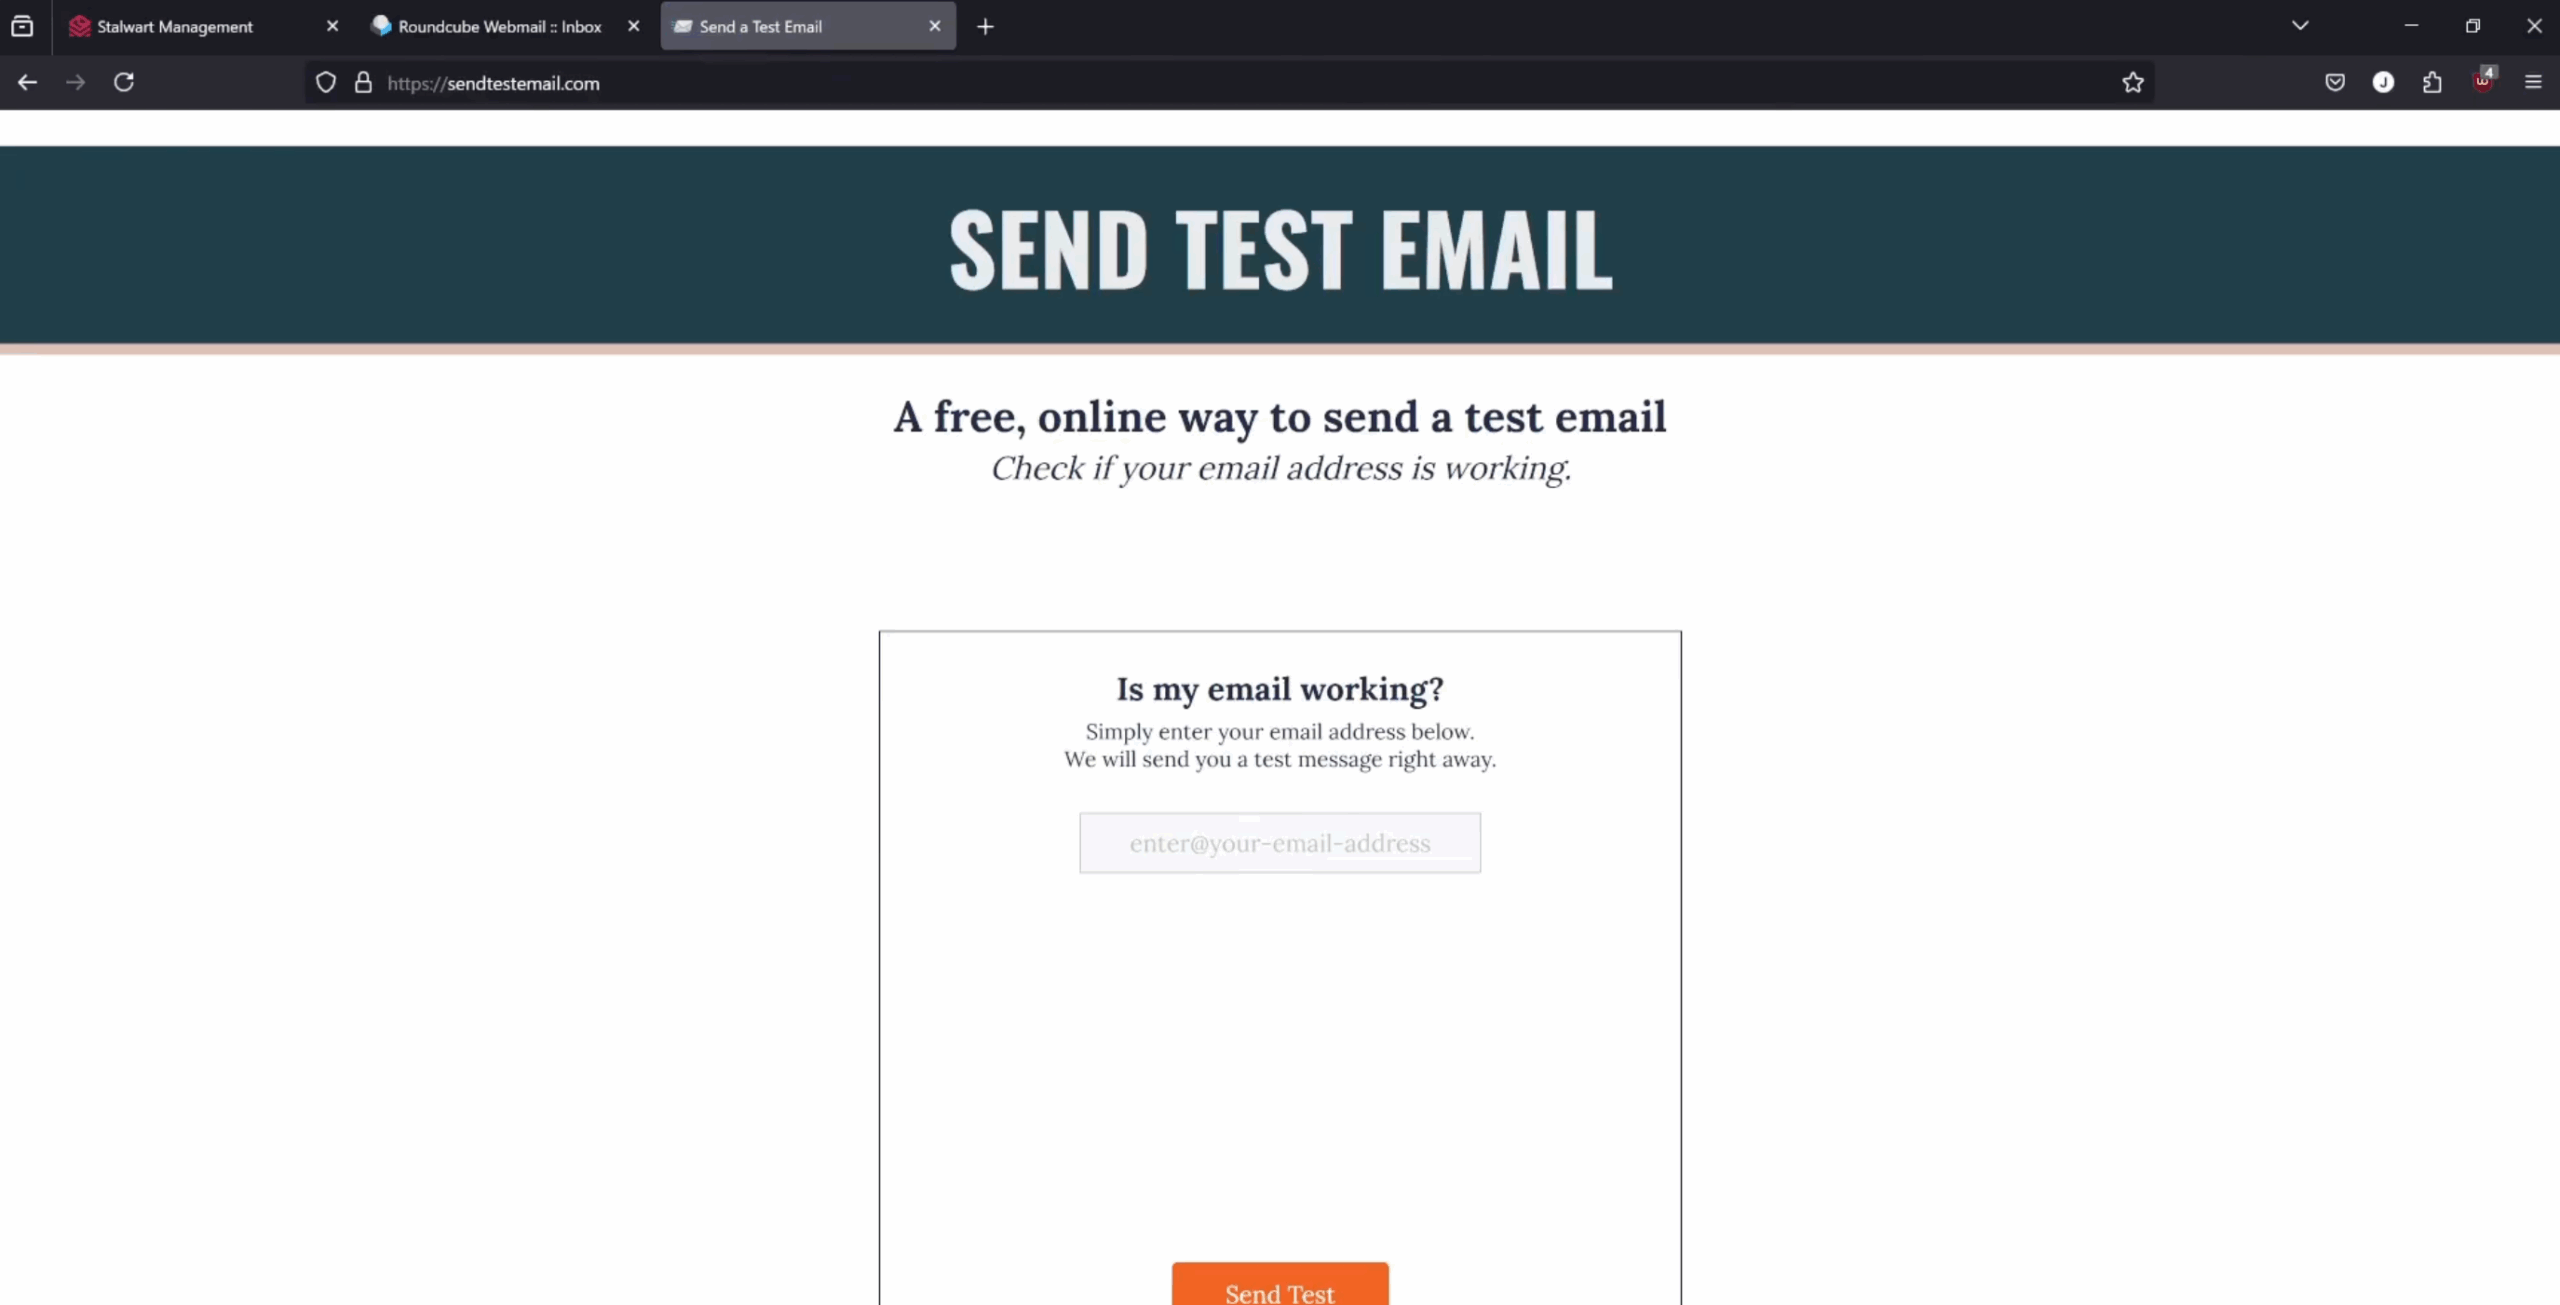
Once you've successfully logged into an email client, we'll do a test to see if our email address and mail server can receive emails and not give bounce back error messages. There is a great website that can test this that you can use here, https://sendtestemail.com/
Once you successfully receive your test email, we can then test if you can send emails out. There is another website that's great for this that you can use here, https://www.mail-tester.com/
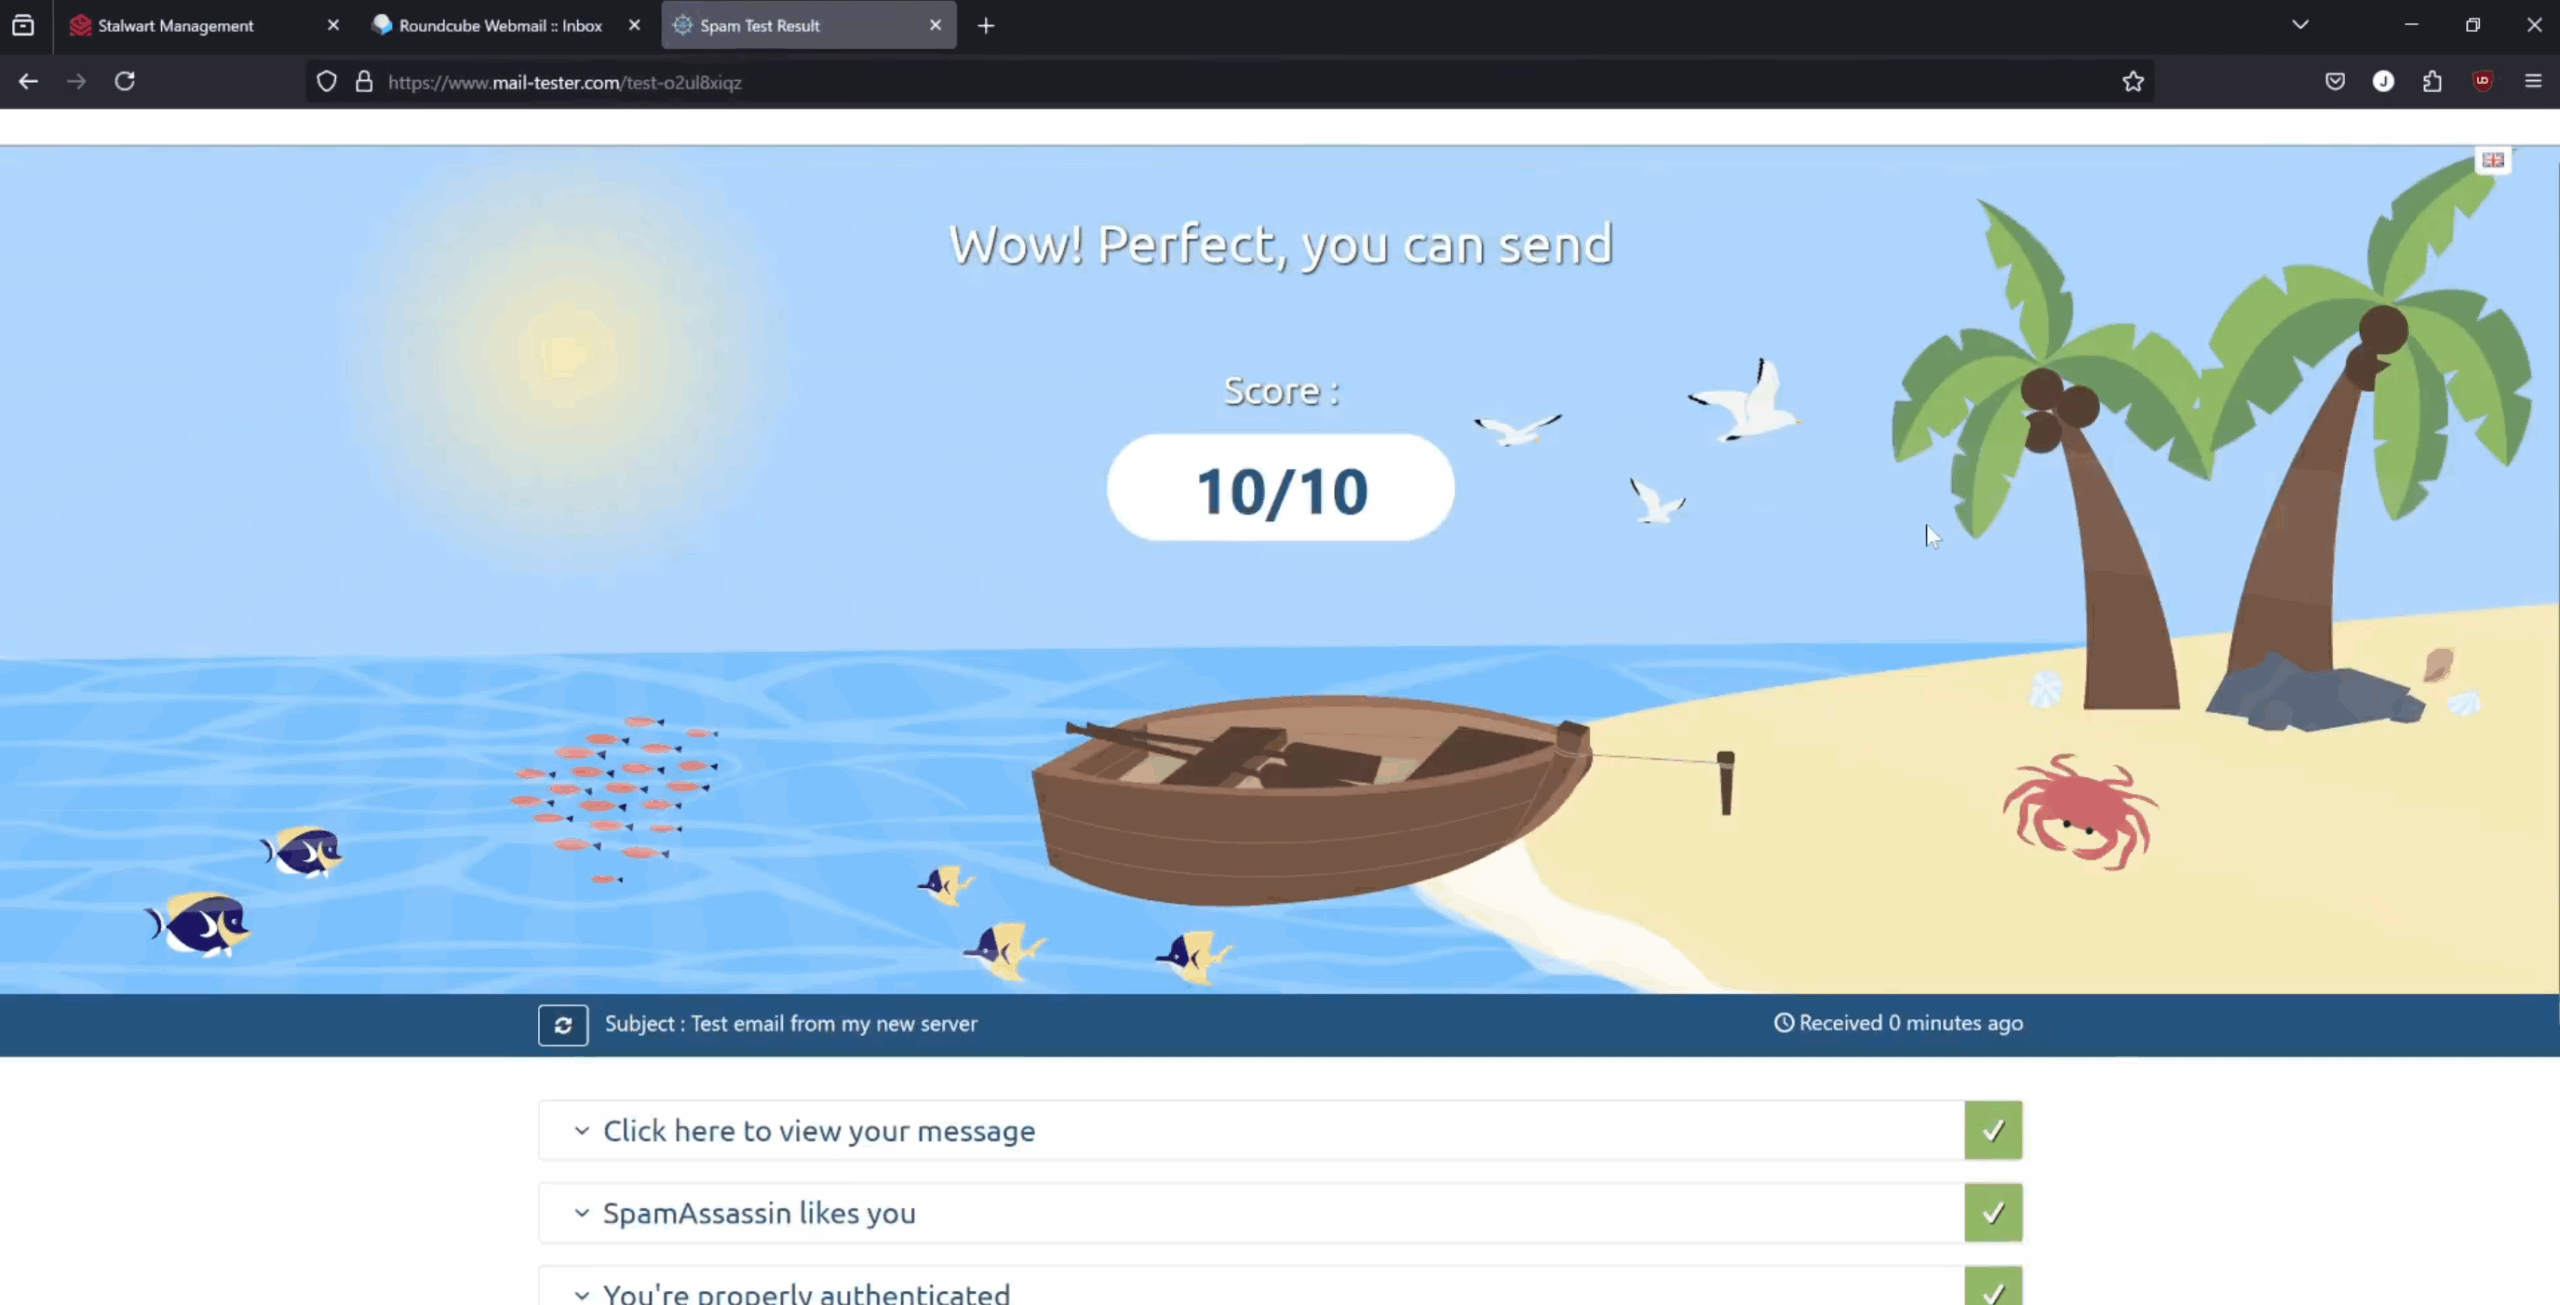
If everything went according to the tutorial, you should have recevied a perfect sending score! That means you have a fully functional email server that you can now send and receive emails with for any domain that you own!